Vamos a celebrar con todos vosotros nuestro primer día de San Valentín en este blog. ¡El día del romanticismo! De los pequeños detalles que se convierten en algo grande.
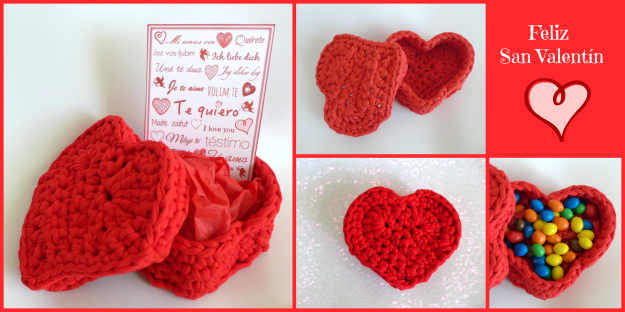
Hemos elaborado una caja en forma de corazón, como no podía ser de otra forma, una tarjeta muy roja, que podéis imprimir y una sencilla idea para envolver vuestro regalo.
We want to celebrate with all of you our first St Valentine’s Day. The day of the romanticism! The small details that turn into something big.
We have elaborated a box in the shape of a heart, a red card and a simple idea to wrap your gift.
CAJA DE TRAPILLO EN FORMA DE CORAZÓN / CHUNKY COTTON BOX
Esta romántica caja con tapa elaborada en trapillo se puede convertir en un joyero, una caja para guardar llaves en un recibidor o cualquier otro objeto pequeño.
This romantic box with an elaborated lid in chunky cotton can be used to keep any small objects such as jewellery, key etc
TUTORIAL PARA UNA CAJA DE 16 cm DE LARGO, 15 cm DE ANCHO Y 6 cm DE ALTURA / TUTORIAL FOR A BOX 16 cm LENGTH, 15 cm WIDTH AND 6 cm HEIGHT
GRADO DE DIFICULTAD
Medio
MATERIALES
Un ovillo de trapillo de color rojo intenso
Aguja de 9 mm
PUNTOS DE CROCHET UTILIZADOS
- cadeneta (c.a.d.)
- punto corredizo (p.c.)
- punto bajo (p.b.)
- punto medio alto (p.m.a.)
- punto alto (p.a.)
DIFFICULTY
Medium
MATERIALS
A ball of chunky red cotton
Hook 9 mm
CROCHET STITCHES
- chain (ch )
- slip stitch
- single crochet (sc)
- half doble (hdc)
- double (dc)
Hemos dividido el tutorial en varios pasos: PASO 1 para formar el corazón, PASO 2 para aumentar su tamaño, PASO 3 para dar altura a la caja, PASO 4 para formar la tapa y PASO 5 para dar altura a la tapa.
We have split the tutorial into 5 steps: STEP 1 to form the heart, STEP 2 to increase its size, STEP 3 to give height to the box, Step 4 to form the lid and STEP 5 to raise the lid.
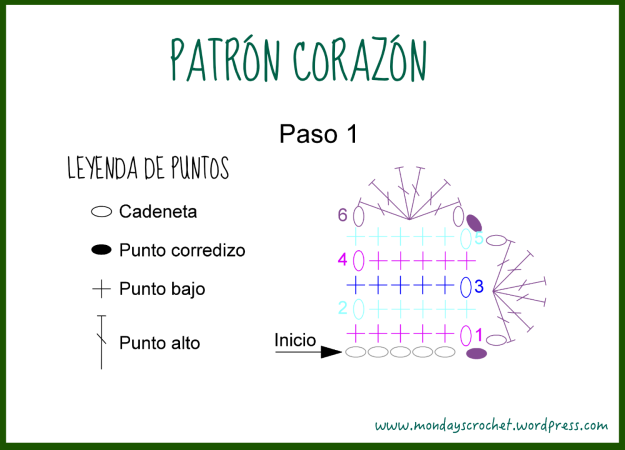
PASO 1: FORMA DEL CORAZÓN
VUELTA INICIAL: 5 c.a.d.
VUELTAS 1 a 5: 1 c.a.d. para comenzar la vuelta, 5 p.b.
Dar la vuelta a la labor para que esta cara sea el apoyo de la caja.
VUELTA 6: Tejer 1 c.a.d. para comenzar la vuelta, 6 p.a. tejidos juntos en el centro de la vuelta número 5, 1 c.a.d. y 1 p.c. en el extremo de la vuelta 5, que será el centro de nuestro corazón. Repetir.
STEP 1: HEART SHAPE
INITIAL ROW : chain 5
ROWS 1-5: chain 1, 5 sc
Turn the work.
ROUND 6: chain 1, 6 dc together in the center of the row, chain 1 and 1 slip stitch. at the end of sc that will be the center of our heart. Repeat.
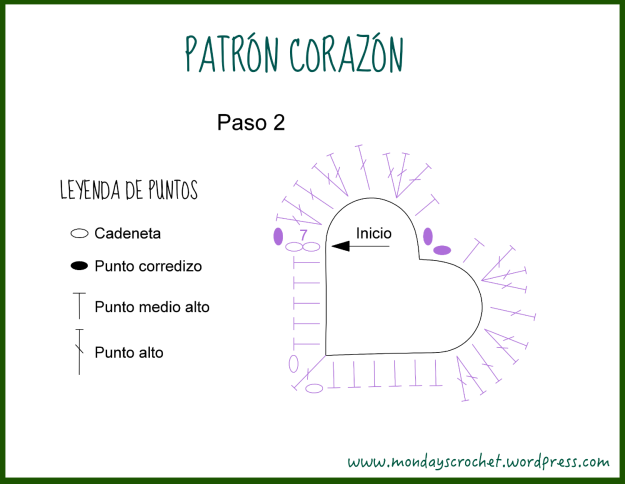
PASO 2: AUMENTO DEL TAMAÑO DEL CORAZÓN
Sin dar la vuelta a nuestra labor tejemos en circular por la cara vista.
VUELTA 7: Tejer 2 c.a.d. para empezar la vuelta, 5 p.m.a., 1 c.a.d. 1 p.a. y 1 c.a.d. en el vértice inferior del corazón. 6 p.m.a., 2 p.a. juntos, 1 p.a., 2 p.a. juntos 1 p.a. 3 p.a. juntos 1 p.m.a. y 1 p.c para llegar al centro de nuestro corazón. Repetir para el otro lado: 1 p.c. 1 p.m.a. 3 p.a. juntos, 1 p.a. 2 p.a. juntos, 1 p.a. 2 p.a. juntos y 1 p.c. para unir con la c.a.d. inicial.
STEP 2: INCREASE IN SIZE OF HEART
Without turning our work around we crochet around the right side.
ROUND 7: chain 2, 5 hdc. chain 1,1 dc. and chain 1 at the lower apex of the heart. 6 hdc., 2 dc together, 1 dc., 2 dc together, 1 dc, 3 dc together, 1 hdc and 1 slip stich to reach the center of our heart. Repeat for the other side: 1 slip stitch. 1 hdc. 3 dc together, 1 dc. 2 dc together, 1 dc,2 dc together and 1 slip stich to join with first chain.
PASO 3: ALTURA DE LA CAJA
Tejer por el lado interior de los puntos para que el apoyo de la caja esté más definido.
VUELTA 8 a 11: Tejer 1 c.a.d. para comenzar la vuelta, 34 p.b. y 1 p.c.
STEP 3: HEIGHT OF THE BOX
Work on the inside of the chains to make the support of the box more defined.
ROUND 8-11: chain 1, 34 sc and 1 slip stitch.
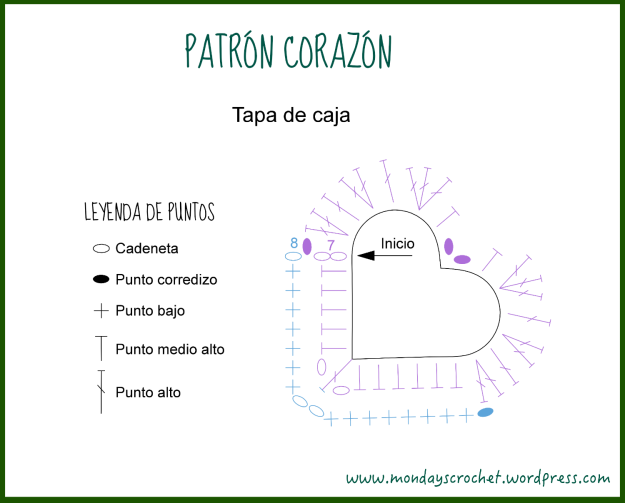
PASO 4: FORMA DEL CORAZÓN EN LA TAPA
Repetir los PASOS 1 y 2.
VUELTA 8 EN LA TAPA: 1 c.a.d. para aumentar el tamaño del corazón, 7 p.b., 2 c.a.d en el extremo del corazón, 8 p.b. y 1 p.c.
STEP 4: HEART SHAPE ON THE TOP
Repeat Steps 1 and 2.
ROW 8 IN THE LID: Chain 1, 7 sc, ch 2 at the end of the heart, 8 sc and 1 slip stitch.
PASO 5: ALTURA DE LA TAPA
Tejer por el lado interior de los puntos para definir el borde en la tapa.
VUELTA 9 y 10 EN LA TAPA: Tejer 1 c.a.d. para comenzar la vuelta, 39 p.b. y 1 p.c.
STEP 5: HEIGHT OF THE TOP
Work on the inner side to define the edge of the lid.
ROW 9 and 10 ON THE LID: Chain 1, 39 sc and 1 slip stitch.
¡Nuestra romántica caja está terminada!
Our romantic box is finished!
TARJETA DE FELICITACIÓN / GRETTING CARD
Hemos diseñado esta tarjeta de felicitación. Es un detalle que solo nos llevará unos minutos imprimir en casa o en la oficina y el resultado puede ser desde una sonrisa, un abrazo, un… maravilloso día de San Valentín.
Simplemente tenéis que copiar, pegar y ajustar al tamaño que más os apetezca. Sólo hay que comprobar que nuestra impresora tenga mucha tinta roja.
We designed the greeting card seen above. This is a little present that it will take just a few minutes to print and the result can be anything – a smile, a hug, a wonderful Valentine…
Just copy, paste and adjust the size as you wish. Just check that your printer has a lot of red ink.
¡Esperamos que os guste!
Hope you like it!
IDEA PARA ENVOLVER REGALOS / IDEA FOR GIFT WRAPPING
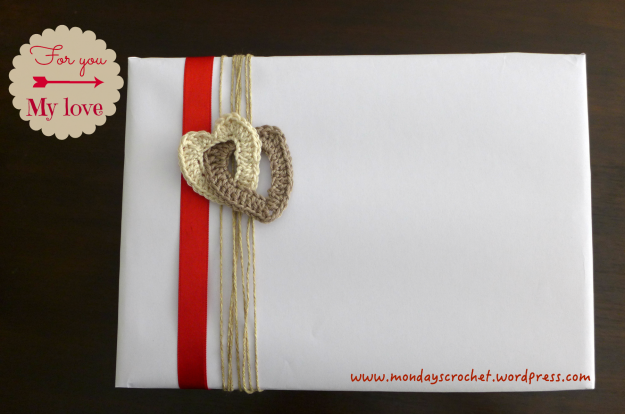
Todos sabemos la importancia de una buena impresión en una caja para regalar. Os proponemos esta sencilla y romántica idea que aún os da tiempo a tejer.
We all know the importance of the first impressions. We suggest this simple and romantic idea for elaborating the wrapping – if you still have time
TUTORIAL PARA CORAZONES ENTRELAZADOS / TUTORIAL – INTERTWINED HEARTS
GRADO DE DIFICULTAD
Bajo
MATERIALES
Hilo de algodón de 2 colores
Aguja de 3 mm
PUNTOS DE CROCHET UTILIZADOS
- Cadeneta (c.a.d.)
- Punto corredizo (p.c.)
- Punto medio (p.m.)
- Punto alto (p.a.)
DIFFICULTY
Easy
MATERIALS
Two colors of cotton
Hook 3 mm
CROCHET STITCHES
- Chain (ch )
- Slip stitch
- Single crochet (sc)
- Half doble (hdc)
- Double (dc)
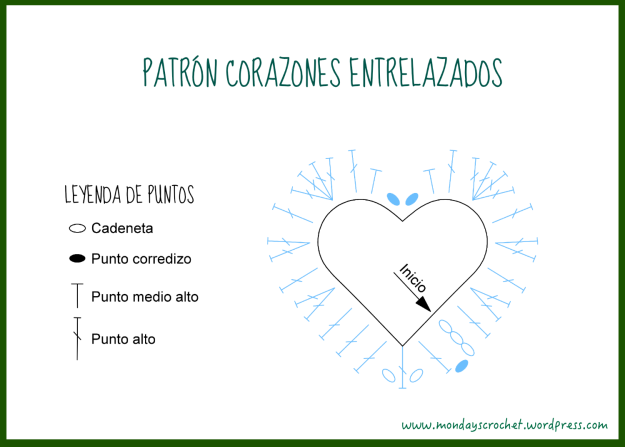
VUELTA INICIAL: 22 c.a.d.
VUELTA 1: Tejer 3 c.a.d. para comenzar la vuelta, 1 p.a., 2 p.a. juntos, 1 p.a., 2 p.a. juntos, 1 p.a., 4 p.a. juntos, 1 p.m.a y 1 p.c. para llegar al centro del corazón. Para el otro lado, 1 p.c. 1 p.m.a, 4 p.a. juntos, 1 p.a., 2 p,a, juntos, 1 p.a., 2 p.a. juntos, 3 p.a., 1 c.a.d 1 p.a. y 1 c.a.d en el extremo inferior del corazón, 1 p.a. y 1 p.c.
INITIAL ROW: chain 22.
ROW 1: chain 3, 1 dc, 2 dc together, 1 dc, 2 dc together, 1 dc, 4 dc together, 1 hdc and 1 slip stitch to reach the center of the heart. For the other side 1 slip stitch, 1 hdc, 4 dc together, 1 dc, 2 dc together, 1 dc, 2 dc together, 3 dc, 1 chain, 1 dc and 1 chain at the botton of the heart, 1dc and 1 slip stitch.
Cosemos los extremos inicial y final de la cadeneta con una aguja de costura.
Tejemos el segundo corazón y antes de coser los extremos de la cadeneta inicial entrelazamos el primer corazón.
Solo nos quedaría prenderlos en una cinta, hilo o simplemente pegarlos en nuestra caja de regalo.
We sew the initial and final ends of the chain with a sewing needle.
Finally we attach the hearts to a ribbon or cord and stick them to our gift box.
¡FELIZ Y ROMÁNTICO SAN VALENTÍN!
HAPPY AND ROMANTIC ST. VALENTINES!

En una de estas me da un arrebato y me pongo a hacer ganchillo!! 🙂 una entrada de lo más romántica! Good for you girls! 🙂
Me gustaMe gusta
Gracias Eileen! me encantaría vivir y disfrutar ese arrebato. Tienes alguno genial!!
Me gustaMe gusta
Me ha encantado que bonito. Esta mañana en un ratito en el tren, me he hecho un corazón que patrón tan sencillo y a la vez tan bonito. Seguir asi ….
Me gustaMe gusta
Mar! Mil gracias. Te has convertido en nuestra seguidora más fiel.
Me gustaMe gusta
Verdaderamente romántico!
Me gustaMe gusta
Gracias! Feliz día de San Valentín.
Me gustaMe gusta
Madre mía!!! yo sí que muero de amor 😍
Qué bonito!!!
Me gustaMe gusta
Genial!!! De eso se trata.
Me gustaMe gusta