Este gorro nos cautivó cuando lo vimos en un modelo para mujer y cuando la pequeña Erika nos dijo que se le había roto su gorro no dudamos en el diseño del patrón.
This hat captivated us when we saw it on an adult model and when young Erika told us that her hat had broken we decided to make one to fit her. 
TUTORIAL DE UN GORRO PARA NIÑA DE 6 AÑOS DE CONTORNO 55 cm / 55 cm DIAMETER 6 YEARS OLD GIRL´S HAT
GRADO DE DIFICULTAD
Medio
MATERIALES
1 ovillo de 100 gr de lana de color gris para tejer con aguja número 5
1 ovillo de 50 gr de lana de color rosa para tejer con aguja número 5
Aguja utilizada número 5
Aguja lanera
Hilo para coser de color gris
Aguja para coser
Botón o adorno para el centro de la flor
Tijeras
PUNTOS DE CROCHET UTILIZADOS
- Cadeneta (c.a.d.)
- Anillo mágico
- Punto corredizo (p.c.)
- Punto bajo (p.b.)
- Punto medio (p.m.)
- Punto alto (p.a.)
- Punto crujido (p.m., p.c.)
- Punto cangrejo de punto bajo (p.can.p.b.)
DIFFICULTY
Medium
MATERIALS
1 ball of 100 gr of wool color gray for hook number 5
1 ball of 50 gr of wool color pink for hook number 5
Hook used number 5
wool needle
Thread color gray
Needle
Button or ornament for the centre of the flower
Scissors
CROCHET STITCHES
- Chain (ch)
- Magic ring
- Slip stitch(sl st)
- Single crochet (sc)
- Half double crochet (hdc)
- Double crochet (dc)
- Creak stitch (hdc, sl st)
- Crab stitch single crochet (cb sc)
DESCRIPCIÓN DE PUNTO CRUJIDO. REVERSIBLE / CREAK STITCH DESCRIPTION. REVERSIBLE
Este sencillo punto tiene la principal característica de formar unos pequeños nudos abultados que embellecen el tejido. Está formado por pares de punto medio, punto corredizo y en la vuelta del revés, tejemos punto medio sobre el punto corredizo y punto corredizo sobre el punto medio. Es un punto ideal para conseguir un resultado denso y resistente.
The main characteristic of this simple stitch is to form small bulky knots that embellish the result. It is composed of pairs of half double crochet, slip stitch, and on the wrong side, half double crochet over the slip stitch and slip stitch over half double crochet. It is an ideal stitch to achieve a dense and resistant result.
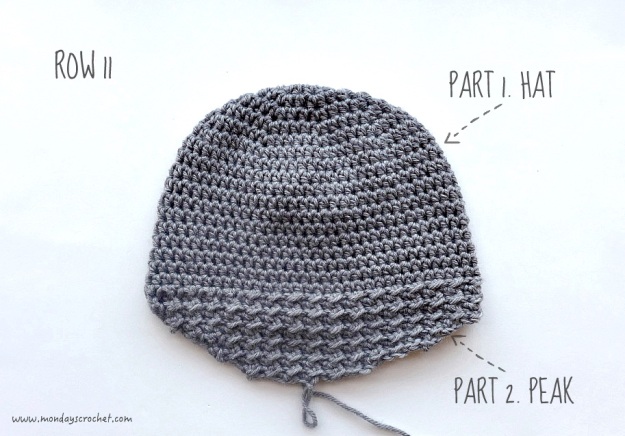
El gorrito está formado por 4 partes: Gorro, visera, cinta de 55 cm y flor de adorno.
The hat has 4 parts: hat, peak, ribbon of 55 cm and a flower.
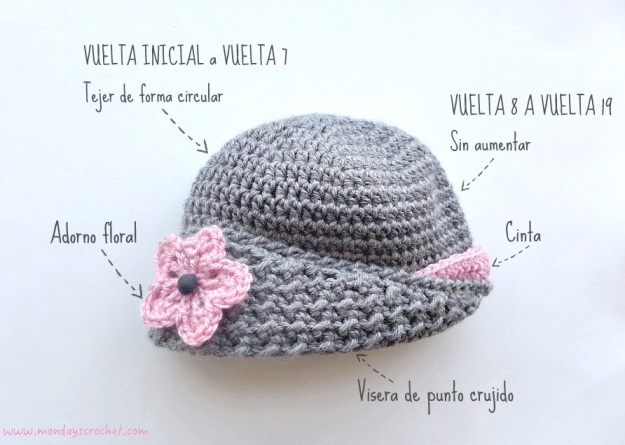
PARTE 1. GORRO / PART 1. HAT
Todo el gorro está tejido con puntos medios.
The hat is made with half double crochet.
 VUELTA INICIAL: Anillo mágico.
VUELTA 1: Tejemos 2 c.a.d. de subida que cuentan como 1 p.m., 8 p.m. Cerramos con 1 p.c. en la c.a.d. de subida. En total 9 p.m.
VUELTA 2: Tejemos 2 c.a.d. de subida que cuentan como 1 p.m y 1 p.m. en el mismo p.m. de la c.a.d. de subida, 1 aumento de 2 p.m. jun. en cada p.m. de la vuelta anterior. Cerramos con 1 p.c. En total 18 p.m.
VUELTA 3: Tejemos 2 c.a.d. de subida que cuentan como 1 p.m. y 1 p.m. en el mismo p.m. de la c.a.d. de subida. Repetimos *1 p.m., 1 aumento de 2 p.m.jun.* hasta completar la vuelta. Terminamos con 1 p.m. y cerramos con 1 p.c. En total 27 p.m.
VUELTA 4: Tejemos 2 c.a.d. de subida que cuentan como 1 p.m. y 1 p.m. en el mismo p.m. de la c.a.d. de subida. Repetimos *2 p.m., 1 aumento de 2 p.m.jun.* hasta completar la vuelta. Terminamos con 2 p.m. y cerramos con 1 p.c. En total 36 p.m.
FOUNDATION ROW: Magic ring.
ROW 1: 2 ch that count as 1 hdc, 8 hdc. Finish off with 1 sl st. 9 hdc in total.
ROW 2: 2 ch that count as 1 hdc, 8 double hdc in each stitch of the previous row. Finish off with 1 sl st. 18 hdc in total.
ROW 3: 2 ch that count as 1 hdc, 1 hdc in the same hdc in the same hdc of the starting ch, 1 hdc, 2 hdc together, 1 hdc. Repeat and finish off with 1 sc. 27 hdc in total.
ROW 4: 2 ch that count as 1 hdc and 1chdc in the same hdc of the starting ch, 2 hdc, 2 hdc together, 2 hdc, 2 hdc together. Repeat and finish off with 1 sl st. 36 hdc in total.

VUELTA 5: Tejemos 2 c.a.d. de subida que cuentan como 1 p.m. y 1 p.m. en el mismo p.m. de la c.a.d. de subida. Repetimos *3 p.m., 1 aumento de 2 p.m.jun.* hasta completar la vuelta. Terminamos con 3 p.m. y cerramos con 1 p.c. En total 45 p.m.
VUELTA 6: Tejemos 2 c.a.d. de subida que cuentan como 1 p.m. y 1 p.m. en el mismo p.m. de la c.a.d. de subida. Repetimos *4 p.m., 1 aumento de 2 p.m.jun.* hasta completar la vuelta. Terminamos con 4 p.m. y cerramos con 1 p.c. En total 54 p.m.
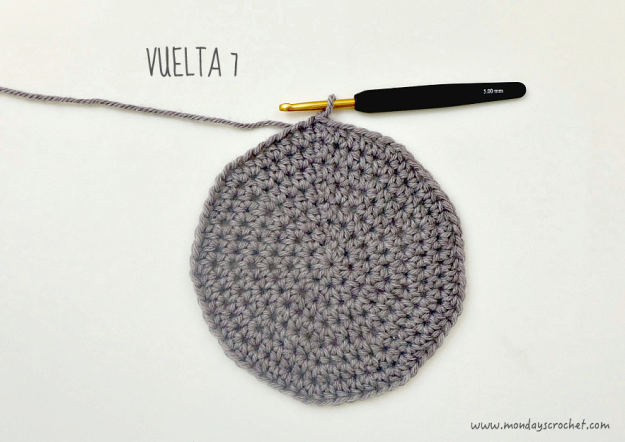
VUELTA 7: Tejemos 2 c.a.d. de subida que cuentan como 1 p.m. y 1 p.m. en el mismo p.m. de la c.a.d. de subida. Repetimos *5 p.m., 1 aumento de 2 p.m.jun.* hasta completar la vuelta. Terminamos con 5 p.m. y cerramos con 1 p.c. En total 63 p.m.
ROW 5: 2 ch that count as 1 dc and 1 hdc in the same hdc of the starting ch, 3 hdc, 2 hdc together, 3 hdc, 2 hdc together. Repeat and finish off with 1 sl st. 45 hdc in total.
ROW 6: 2 ch that count as 1 dc and 1 hdc in the same hdc of the starting ch , 4 hdc, 2 hdc together, 4 hdc, 2 hdc together. Repeat and finish off with 1 sl st. 54 hdc in total.
ROW 7: 2 ch that count as 1 dc and 1 hdc in the same hdc of the starting ch, 5 hdc, 2 hdc together, 5 hdc, 2 hdc together. Repeat and finish off with 1 sl st. 54 hdc in total.
VUELTA 8 a 19: Tejemos 2 c.a.d. de subida y 1 punto en cada p.m. de la vuelta anterior. En total 63 p.m. No cerrar y continuar tejiendo en espiral sobre la c.a.d. de subida. Poner un marcador en el punto tejido sobre la c.a.d de subida para saber las vueltas que tejemos. Cuando lleguemos a la vuelta 19 cerrar con 1 pc. No cortar el hilo para comenzar con la visera.

ROW 8 to 19: 2 ch and 1 stitch in each hdc of the previous row. 63 hdc in total. Do not close and continue working in a circle. Place a marker in the stitch over the starting ch in order to count the rows. Once we reach row 19 finish off with a sl st. Do not cut the thread to start the peak.
PARTE 2. VISERA DEL GORRO / PART 2. PEAK
Dividir el total de puntos, en 3 partes iguales. Obtenemos 21 puntos. Vamos a utilizar 42 puntos y el resto lo dejamos sin tejer.
 La visera se comienza a tejer por el revés o interior del gorro con punto crujido (p.m., p.c.).
VUELTA 1 REVÉS: Después del p.c. que hemos tejido para terminar el gorro comenzamos con el punto crujido (p.m., p.c.) el primer punto es 1 p.m., seguido de 1 p.c. en cada punto de la vuelta anterior. En total 42 puntos.
VUELTA 2 DERECHO: Sin hacer c.a.d. de subida, tejer punto crujido (p.m., p.c) sin llegar al final de los puntos. Terminar con 1 p.c. En total 40 puntos.
VUELTA 3 REVÉS: Sin hacer c.a.d. de subida, tejer punto crujido (p.m., p.c) sin llegar al final de los puntos. Terminar con 1 pc. En total 38 puntos.
VUELTA 4 DERECHO: Comenzando por 1 p.c. tejer punto crujido (p.m., p.c) sin llegar al final de los puntos. Terminar con 1 p.c. En total 34 puntos.
VUELTA 5 REVÉS: Comenzando por 1 p.c. tejer punto crujido (p.m., p.c) sin llegar al final de los puntos. Terminar con 1 p.c. En total 32 puntos.
VUELTA 6 DERECHO: Comenzando por 1 p.c. tejer punto crujido (p.m., p.c) sin llegar al final de los puntos. Terminar con 1 p.c. En total 28 puntos.
VUELTA 7 REVÉS: Comenzando por 1 p.c. tejer punto crujido (p.m., p.c) sin llegar al final de los puntos. Terminar con 1 p.c. En total 27 puntos.
VUELTA 8 DERECHO: Comenzando por 1 p.c. tejer punto crujido (p.m., p.c) sin llegar al final de los puntos. Terminar con 1 p.c. En total 25 puntos.
VUELTA 9 REVÉS: Tejer una disminución de 3 p.c. Seguir con punto crujido (p.m., p.c) sin llegar al final de los puntos. Terminar con 1 p.m. En total 18 puntos.
VUELTA 10 DERECHO: Tejer una disminución de 2 p.c. Seguir con punto crujido (p.m., p.c) sin llegar al final de los puntos. Terminar con 1 p.c. En total 14 puntos.
VUELTA 11 REVÉS: Tejer una disminución de 3 p.c. Seguir con punto crujido (p.m., p.c) sin llegar al final de los puntos. Terminar con 1 p.c. En total 10 puntos.
VUELTA 12 REVÉS: Tejemos alrededor de la visera 1 p.c., 34 p.b. y cerramos con 1 p.c.

VUELTA 13 REVÉS: Tejemos p.can. de punto bajo por todo el interior del gorro. Para que al dar la vuelta a la visera se vea por la cara derecha.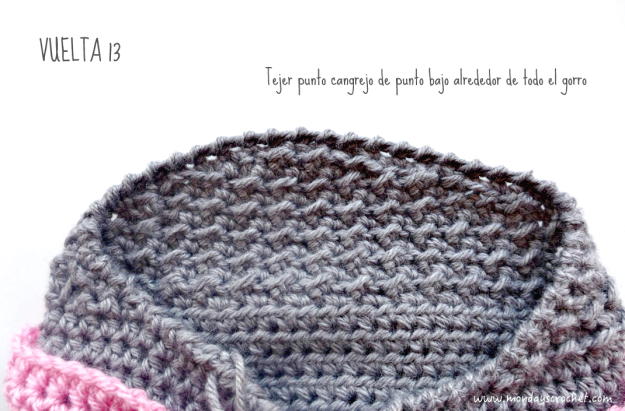
Divide the total number of stitches into 3 equal parts. You will obtain 21 stitches. We will use 42 stitches, we will not make the rest, they are undone.
Start the peak on the wrong side with stitch.
ROW 1 WRONG SIDE: After the sl st we have done to finish the hat, start with the creak stitch (1 hdc, 1 sl st) in each stitch of the previous row. 42 stitches in total.
ROW 2 RIGHT SIDE: Without make the starting ch, make creak stitch (hdc, sl st) without reaching the end of the row. 40 stitches in total.
ROW 3 WRONG SIDE: Without make the starting ch, make creak stitch (hdc, sl st) without reaching the end of the row. 38 stitches in total.
ROW 4 RIGHT SIDE: Start with a sl st, make creak stitch (hdc, sl st) without reaching the end of the row. 34 stitches in total.
ROW 5 WRONG SIDE: Start with a sl st, make creak stitch (hdc, sl st) without reaching the end of the row. 32 stitches in total.
ROW 6 RIGHT SIDE: Start with a sl st, make creak stitch (hdc, sl st) without reaching the end of the row. 28 stitches in total.
ROW 7 WRONG SIDE: Start with a sl st, make creak stitch (hdc, sl st) without reaching the end of the row. 27 stitches in total.
ROW 8 RIGHT SIDE: Start with a sl st, make creak stitch (hdc, sl st) without reaching the end of the row. 25 stitches in total.
ROW 9 WRONG SIDE: Make a decrease of 3 sl st. Keep making creak stitch (hdc, sl st) without reaching the end. Finish with 1 hdc. 18 stitches in total.
ROW 10 RIGHT SIDE: Make a decrease of 2 sl st. Keep making creak stitch (hdc, sl st) without reaching the end. Finish with 1 sl st. 14 stitches in total.
ROW 11 WRONG SIDE: Make a decrease of 3 sl st. Keep making creak stitch (hdc, sl st) without reaching the end. Finish with 1 sl st. 10 stitches in total.
ROW 12 WRONG SIDE: Work around the peak 1 sl st, 34 sc and and finish off with sl st.
ROW 13 WRONG SIDE: Crab stitch on all the inside of the hat to enable you to see the right side when you turn the peak.
PARTE 3. CINTA ALREDEDOR DEL GORRO / PART 3. RIBBON AROUND THE HAT
Con lana de color rosa.
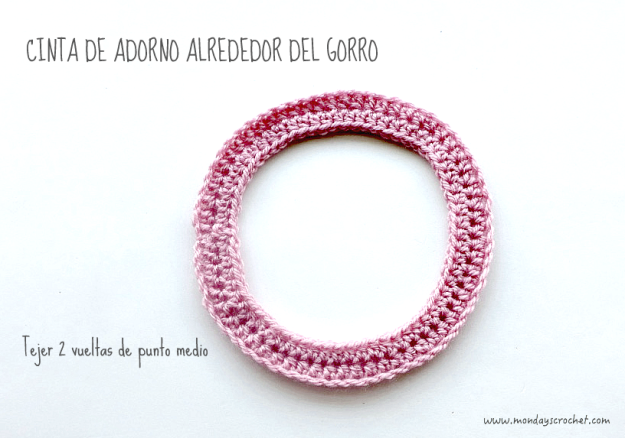
VUELTA INICIAL: Tejemos 65 puntos de c.a.d.
VUELTA 1: Tejemos 2 c.a.d. de subida y 64 p.m. Cerramos con 1 p.c. a la parte superior de la c.a.d. de subida de a vuelta inicial.
VUELTA 2: Tejemos 2 c.a.d. de subida y 64 p.m. Cerramos con 1 p.c.
Con una aguja lanera rematamos el inicio y final de la cinta y cortamos el hilo sobrante con unas tijeras.

Prendemos la cinta al gorro con hilo de coser color gris.

Pink wool.
FOUNDATION ROW: 65 ch
ROW 1: 2 ch and 64 hdc. Finish off off with sl st on the top part of the starting ch of the foundation row.
ROW 2: 2 ch and 64 hdc. Fasten off with a sl st.
With a wool needle sew up the remaining thread.
Pin the ribbon to the hat and sew with a grey thread.
PARTE 4. ADORNO FLORAL / PART 4. FLOWER
Hemos diseñado una flor para adornar el gorro.
We have designed a flower for the hat.
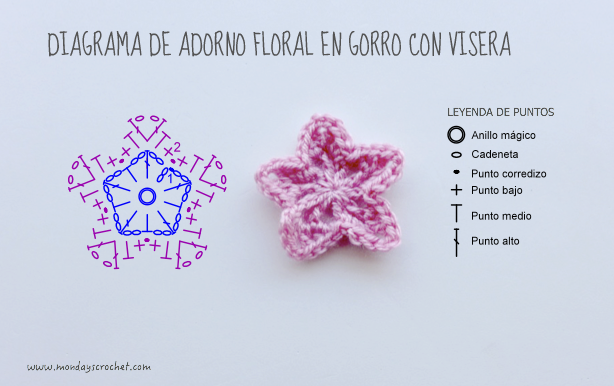
Con lana de color rosa.
VUELTA INICIAL: Tejer un anillo mágico.
VUELTA 1: Dentro del anillo mágico tejer 2 c.a.d. de subida, 2 c.a.d. de separación, 1 p.a., 2 c.a.d. de separación, 1 p.m., 2 c.a.d. de separación. En total 5 p.a. y 4 p.m. separados por 2 c.a.d. Cerrar con 1 p.c. a la c.a.d. de subida.
VUELTA 2: Tejer 1 p.b. 1 p.m. 1 p.a. en las 2 primeras c.a.d de separación de la vuelta anterior. Seguimos con 2 c.a.d y tejemos 1 p.a. 1 p.m y 1 p.b. en la siguiente c.a.d. de separación de la vuelta anterior. Cerrar con 1 p.c. en el p.m. de la vuelta anterior para formar el primer pétalo. Repetir 4 pétalos más.
Pink wool.
FOUNDATION ROW: Magic ring.
ROW 1: Inside the magic ring make 2 ch to start the row, 2 ch, 1 dc, 2 ch, 1 hdc, 2 ch. In total 5 dc and 4 hdc separated by 2 ch. Fasten off with 1 sl st.
ROW 2: 1 sc, 1 hdc, 1 dc in the first 2 ch of the previous row. 2 ch and y 1 dc, 1 hdc and 1 sc in the next ch of the previous row. Fasten off with 1 sl st 1 p.c. in the hdc of the previous row to form the first petal. Repeat 4 more times.
¡Estamos deseando ver vuestros gorros!
We are looking forward seeing your hats!

Maravilloso y hermoso trabajo, me estoy iniciando en el crochet hay algo que no comprendo es la visera cuando dices comenzar tejiendo de revés es como cuando tejes el punto cangrejo de esa misma forma. Se me hace confuso podrías ayudarme, gracias mil tu página y tutorial es genial
Me gustaMe gusta
Hola, muchas gracias por tus bonitas palabras.
La visera se teje por el derecho y el revés, no en circular como hemos hecho hasta ahora.
El punto utilizado es reversible. Te quedará igual por el derecho y por el revés.
Esperamos haberte ayudado y cuando lo termines nos envías una foto a mondayscrochet@outlook.es
Un saludo
Me gustaMe gusta
Esta hermoso el gorro y muy padre las explicaciones que ponen, gracias por compartir tus enseñanzas
Me gustaMe gusta
Muchísimas gracias Sandra! Hacemos los tutoriales con mucho cariño.
Has tejido el gorro? Envíanos una foto a mondayscrochet@outlook.es disfrutamos mucho con vuestros resultados.
Me gustaMe gusta
Hola!! Buenos días! Una pregunta, ¿si quisiera hacer el gorro un poco más grande, cuántas vueltas debo hacer? Sería para una niña de 10 años. Gracias!
Me gustaMe gusta
Hola! El gorro tiene una primera parte de aumentos y una segunda en la que no se aumenta. Mide el contorno de la cabeza de la niña. Esta medida debe coincidir con el contorno de la última vuelta de aumentos. Creo que con 9 vueltas sería suficiente.
No dudes en escribirnos a:
mondayscrochet@outlook.es
Gracias por seguirnos!
Me gustaMe gusta
Excelente! Intentaré hacerlo éste fin de semana! Muchas gracias!
Me gustaMe gusta
Super hermoso , lo intemntaré
Me gustaMe gusta
Inténtalo y cuéntanos cómo te ha quedado. Con tus manos, seguro que precioso!
Me gustaMe gusta
Pingback: CLASE 8. CÓMO LEER UN DIAGRAMA CIRCULAR DE CROCHET. CÍRCULO PERFECTO / HOW TO READ A CIRCULAR DIAGRAM IN CROCHET. PERFECT CIRCLE |
Precioso!! Enhorabuena, está fenomenal!:)
Me gustaMe gusta
Me encanta!!!!!
Me gustaMe gusta
Gracias! Anímate a tejerlo.
Me gustaMe gusta
Es precioso! Erika está encantada y feliz de tenerlo. Pero… no se lo llevará al colegio para no perderlo, menudo disgusto si no, jiji. Así que ya tiene gorrito precioso para los fines de semana. Mil gracias 🙂
Me gustaMe gusta
Cuánto nos alegra que le guste. Está guapísima y es una modelo estupenda. Muchas gracias!
Me gustaMe gusta
Pues yo tengo un gorro super bonito, pero es para algo más de seis años. 🙂 Besitos
Me gustaMe gusta
El tuyo está tejido con el mismo cariño. Nos alegra que presumas de gorro.
Me gustaLe gusta a 1 persona
Me encanta el gorro y el detalle de la flor maravilloso!!!
Me gustaMe gusta
¡Gracias! Probamos con botón, lazo, sin detalle… La flor nos convenció.
Me gustaLe gusta a 1 persona
Quedó precioso
Me gustaMe gusta
¡Gracias! Estamos muy orgullosas.
Me gustaLe gusta a 1 persona