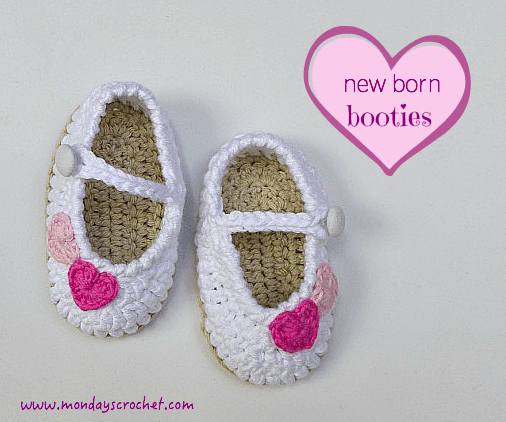
La llegada de un bebé es un acontecimiento muy especial y sus primeros patucos son un recuerdo para siempre. Hemos tejido estos patucos de crochet y os contamos los 9 sencillos pasos que podéis seguir para hacerlos.
The arrival of a baby is a very special event and their first booties are a memento forever. We have crocheted these booties and we will show you the tutorial in 9 simple steps.

TUTORIAL DE PATUCOS PARA RECIÉN NACIDO / NEWBORN BOOTIES TUTORIAL
GRADO DE DIFICULTAD
Medio
MATERIALES
1 ovillo de 50 gr de algodón en color camel
1 ovillo de 50 gr de algodón en color blanco
Algodón de colores para decorar los patucos
Aguja número 3
Aguja lanera
Aguja normal
Hilo blanco para coser
Botón o automático pequeño
PUNTOS DE CROCHET UTILIZADOS
- Cadeneta (c.a.d.)
- Punto corredizo (p.c.)
- Punto bajo (p.b.)
- Punto medio (p.m.)
- Punto alto (p.a.)
- Punto cangrejo de punto bajo (p.can.pb.)
DIFFICULTY
Medium
MATERIALS
1 ball of 50 gr of cotton in camel
1 ball of 50 gr of cotton in white
cotton in assorted colors to decorate the booties
Hook number 2 and 3
Tapestry needle
Normal needle
White thread
Button or small studs
STITCHES
- Chain stitch (ch)
- Slip Stitch (sl st)
- Single crochet (sc)
- Half double crochet (hdc)
- Double crochet (dc)
- Crab stitch single crochet
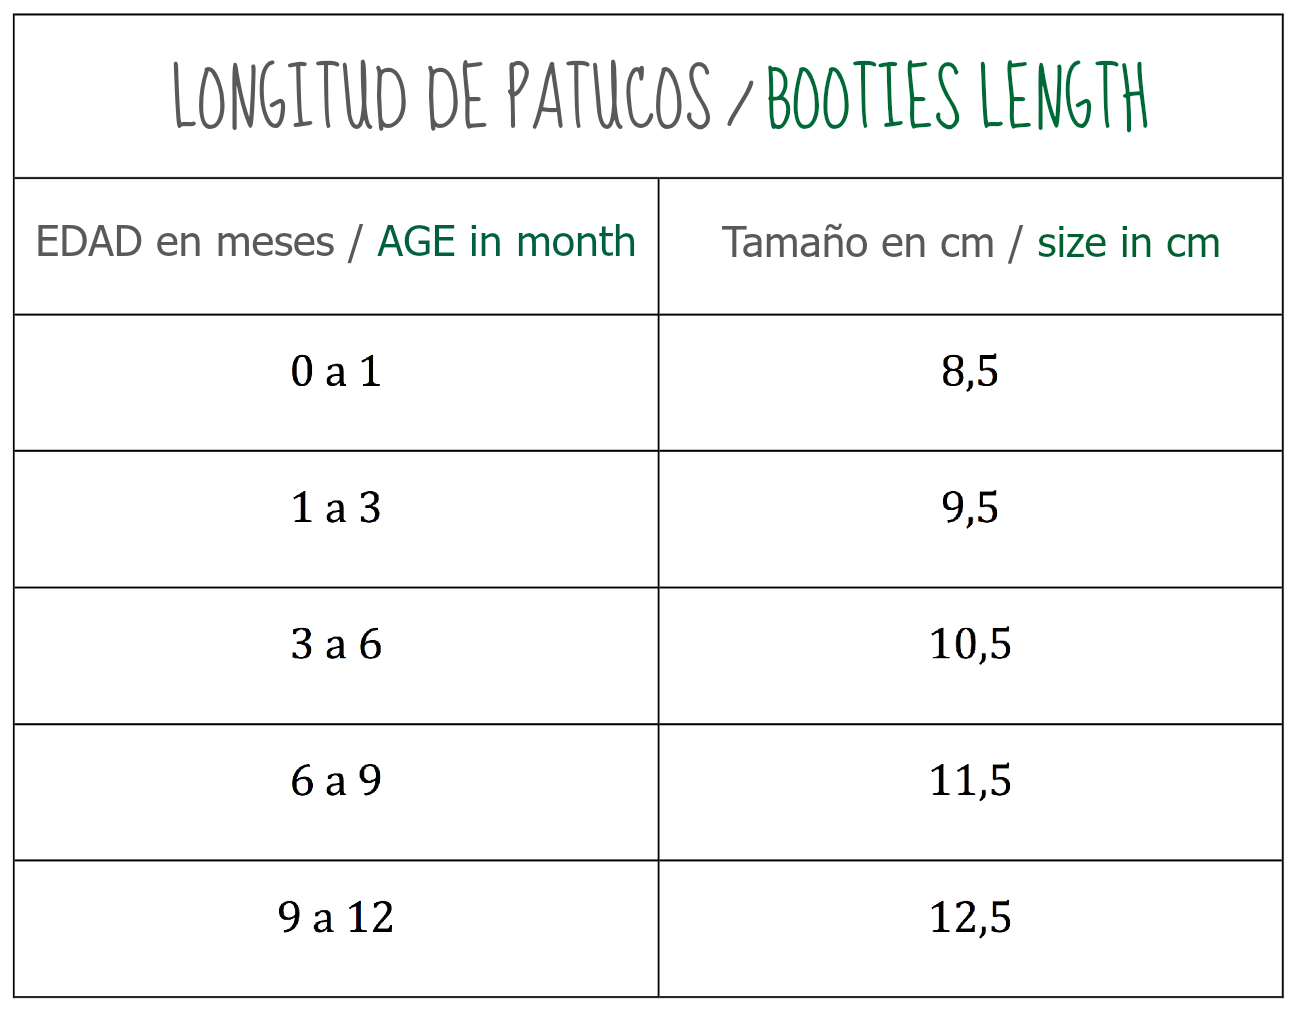
TABLA DE LONGITUD DE PATUCOS DE BEBÉ / BABY BOOTIES SIZE CHART
PASO 1.- SUELA DEL PATUCO / STEP 1. BOOTIES SOLE
Comenzamos nuestros patucos por la suela. Las suelas de los dos patucos son iguales.
Start the booties from the sole. The soles are the same for both booties.
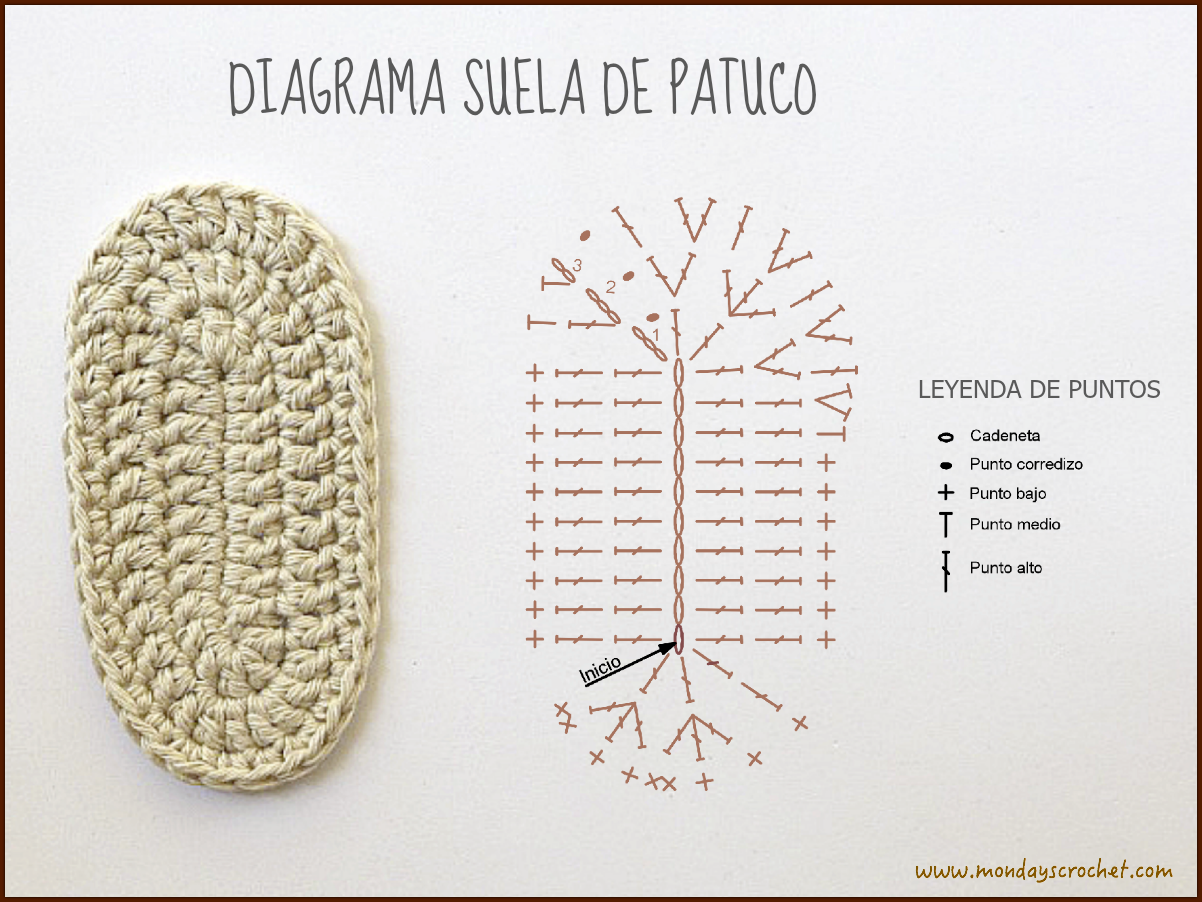
Tejemos la suela con una aguja número 3 para un hilo de algodón de número 4. Conseguimos una suela muy firme.
VUELTA INICIAL: Tejemos 10 c.a.d.
VUELTA 1: 3 c.a.d. de subida y 1 p.a. en la misma c.a.d., 8 p.a. en cada c.a.d. inicial, 5 p.a. en la primera c.a.d., 8 p.a. en cada c.a.d. inicial, 3 p.a. en la última c.a.d. y cerramos con 1 p.c. a la c.a.d. de subida.
VUELTA 2: 3 c.a.d. de subida y 1 p.a. en la misma c.a.d. de subida de la vuelta anterior, 10 p.a. en cada p.a. de la vuelta anterior. En el talón 3 p.a. juntos y 3 p.a. juntos. Seguimos con 10 p.a. en cada p.a. de la vuelta anterior. En la puntera 2 p.a. juntos, 3 p.a. juntos, 2 p.a. juntos y cerramos con 1 p.c. a la c.a.d. de subida.
VUELTA 3: 2 c.a.d. de subida y 1 p.m. en la misma c.a.d. de subida de la vuelta anterior. 1 p.m. y 10 p.b. en cada p.a. de la vuelta anterior. En el talón 2 p.b. juntos, 1 p.b., 1 p.b. y 2 p.b juntos. Seguimos con 10 p.b. en cada p.a. de la vuelta anterior. En la puntera 1 p.m. 2 p.m. juntos, 1 p.a., 2 p.a. juntos, 1 p.a., 2 p.a. juntos, 1 p.a., 2 p.a. juntos, 1 p.a. y cerramos con 1 p.c. a la c.a.d. de subida.
INITIAL ROW: 10 ch.
ROW 1: 3 ch to start the row and 1 dc in the same stitch. 8 dc in every initial ch, 5 dc in the first chain., 8 dc in each initial ch, 3 dc in the last chain and finish off with 1 sl st.
ROW 2: 3 ch to start the row and 1 dc in the same stitch, dc in each dc of the previous row. In the heel 3 dc together and 3 dc together. 10 dc in each dc of the previous row. In the toe 2 dc together, 3 dc together, 2 dc together and finish off with 1 sl st.
ROW 3: 2 ch to start the row and 1 hdc in the same stitch of the previous row. 1 hdc and 10 sc in each dc of the previous row. In the heel 2 sc together, 1 sc, 1 sc and 2 sc together. 10 sc in each dc of the previous row. In the toe, 1 hdc, 2 hdc together, 1 dc, 2 dc together, 1 dc, 2 dc together, 1 dc, 2 dc together, 1 dc and finish off with 1 sl st.
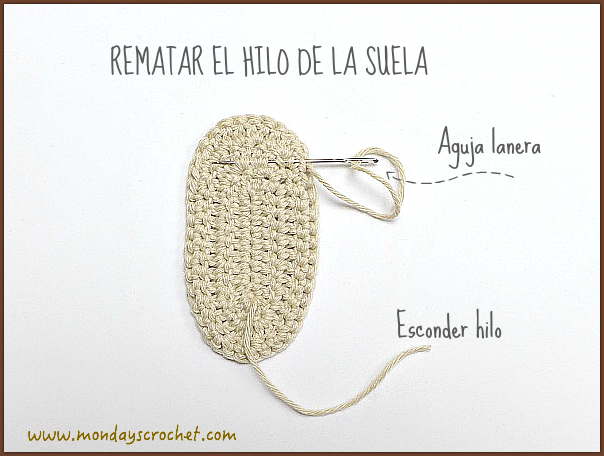
PASO 2.- REMATAR HILO DE LA SUELA / STEP 2. FINISH OFF THE ENDS BY HIDING THE THREAD OF THE SOLE
Para rematar los cabos de la suela escondemos el hilo rematando con una aguja lanera el hilo de inicio y final de la suela. Cortamos el hilo sobrante.
To finish off the ends hide the thread with a wool needle. Cut the excess thread.

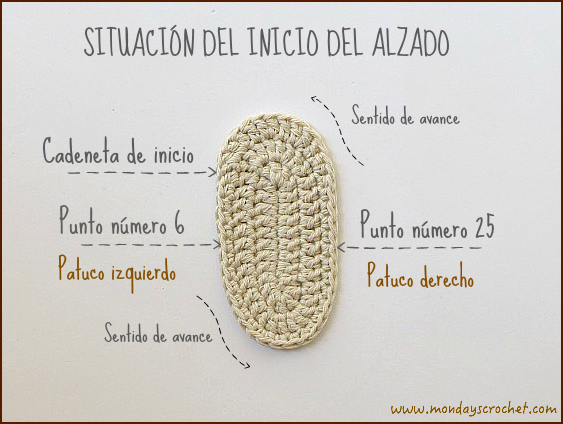
PASO 3.- ALZADO DEL PATUCO / STEP 3. BUILD UP THE SIDES
Tejemos el alzado con una aguja número 3 para un hilo de algodón número 4.
Cambiamos de color, nosotras hemos utilizado color blanco para el alzado. Dependiendo del patuco que vayamos a empezar situamos su inicio en el número 6 de la última vuelta de puntos para el patudo izquierdo o en el número 25 para el patudo derecho.
Change color. We have used white for the elevation of the booties. Start at number 6 of the previous row for the left booty or at number 25 for the right one.
PATUCO DERECHO / BABIES RIGHT BOOTY
Comenzamos a tejer el alzado del patuco derecho en el punto 25 de la última vuelta de la suela, por el revés y dejando las dos lazadas vistas de la suela del patuco. VER FOTO DE ABAJO.
Begin to make the elevation of the right sole at stitch 25 of the previous row, inside out and leaving two loops visible of the sole. SEE PHOTOGRAPH BELOW.

VUELTA 1.- Tejer 3 c.a.d. de subida, 41 p.a. y cerramos en la c.a.d. de subida con 1 p.c.
VUELTA 2.- 3 c.a.d. de subida, 5 p.a. en cada p.a. de la vuelta anterior, disminución de 2 p.a., 2 p.a., 4 disminuciones de 2 p.a., 2 p.a., 1 disminución de 2 p.a., 20 p.a. y cerramos en la c.a.d. de subida con 1 p.c.
VUELTA 3.- 1 c.a.d. de subida, 5 p.b. en cada p.a. de la vuelta anterior, 1 p.m., 2 disminuciones de 3 p.a., 1 p.m., 21 p.b. y cerramos en la c.a.d. de subida con 1 p.c.
ROW 1.- 3 ch to start the row, 41 dc and finish off with 1 sl st.
ROW 2.- 3 ch to start the row , 5 dc in each dc of the previous row, decrease 2 dc, 2 dc, 4 decreases of 2 dc 2 dc, 1 decrease of 2 dc, 20 dc and finish off with a sl st.
ROW 3.- 1ch to start the row 5 sc in each dc of the previous row, 1hdc, 2 decreases of 3 dc, 1 hdc, 21 sc and finish off with a sl st.

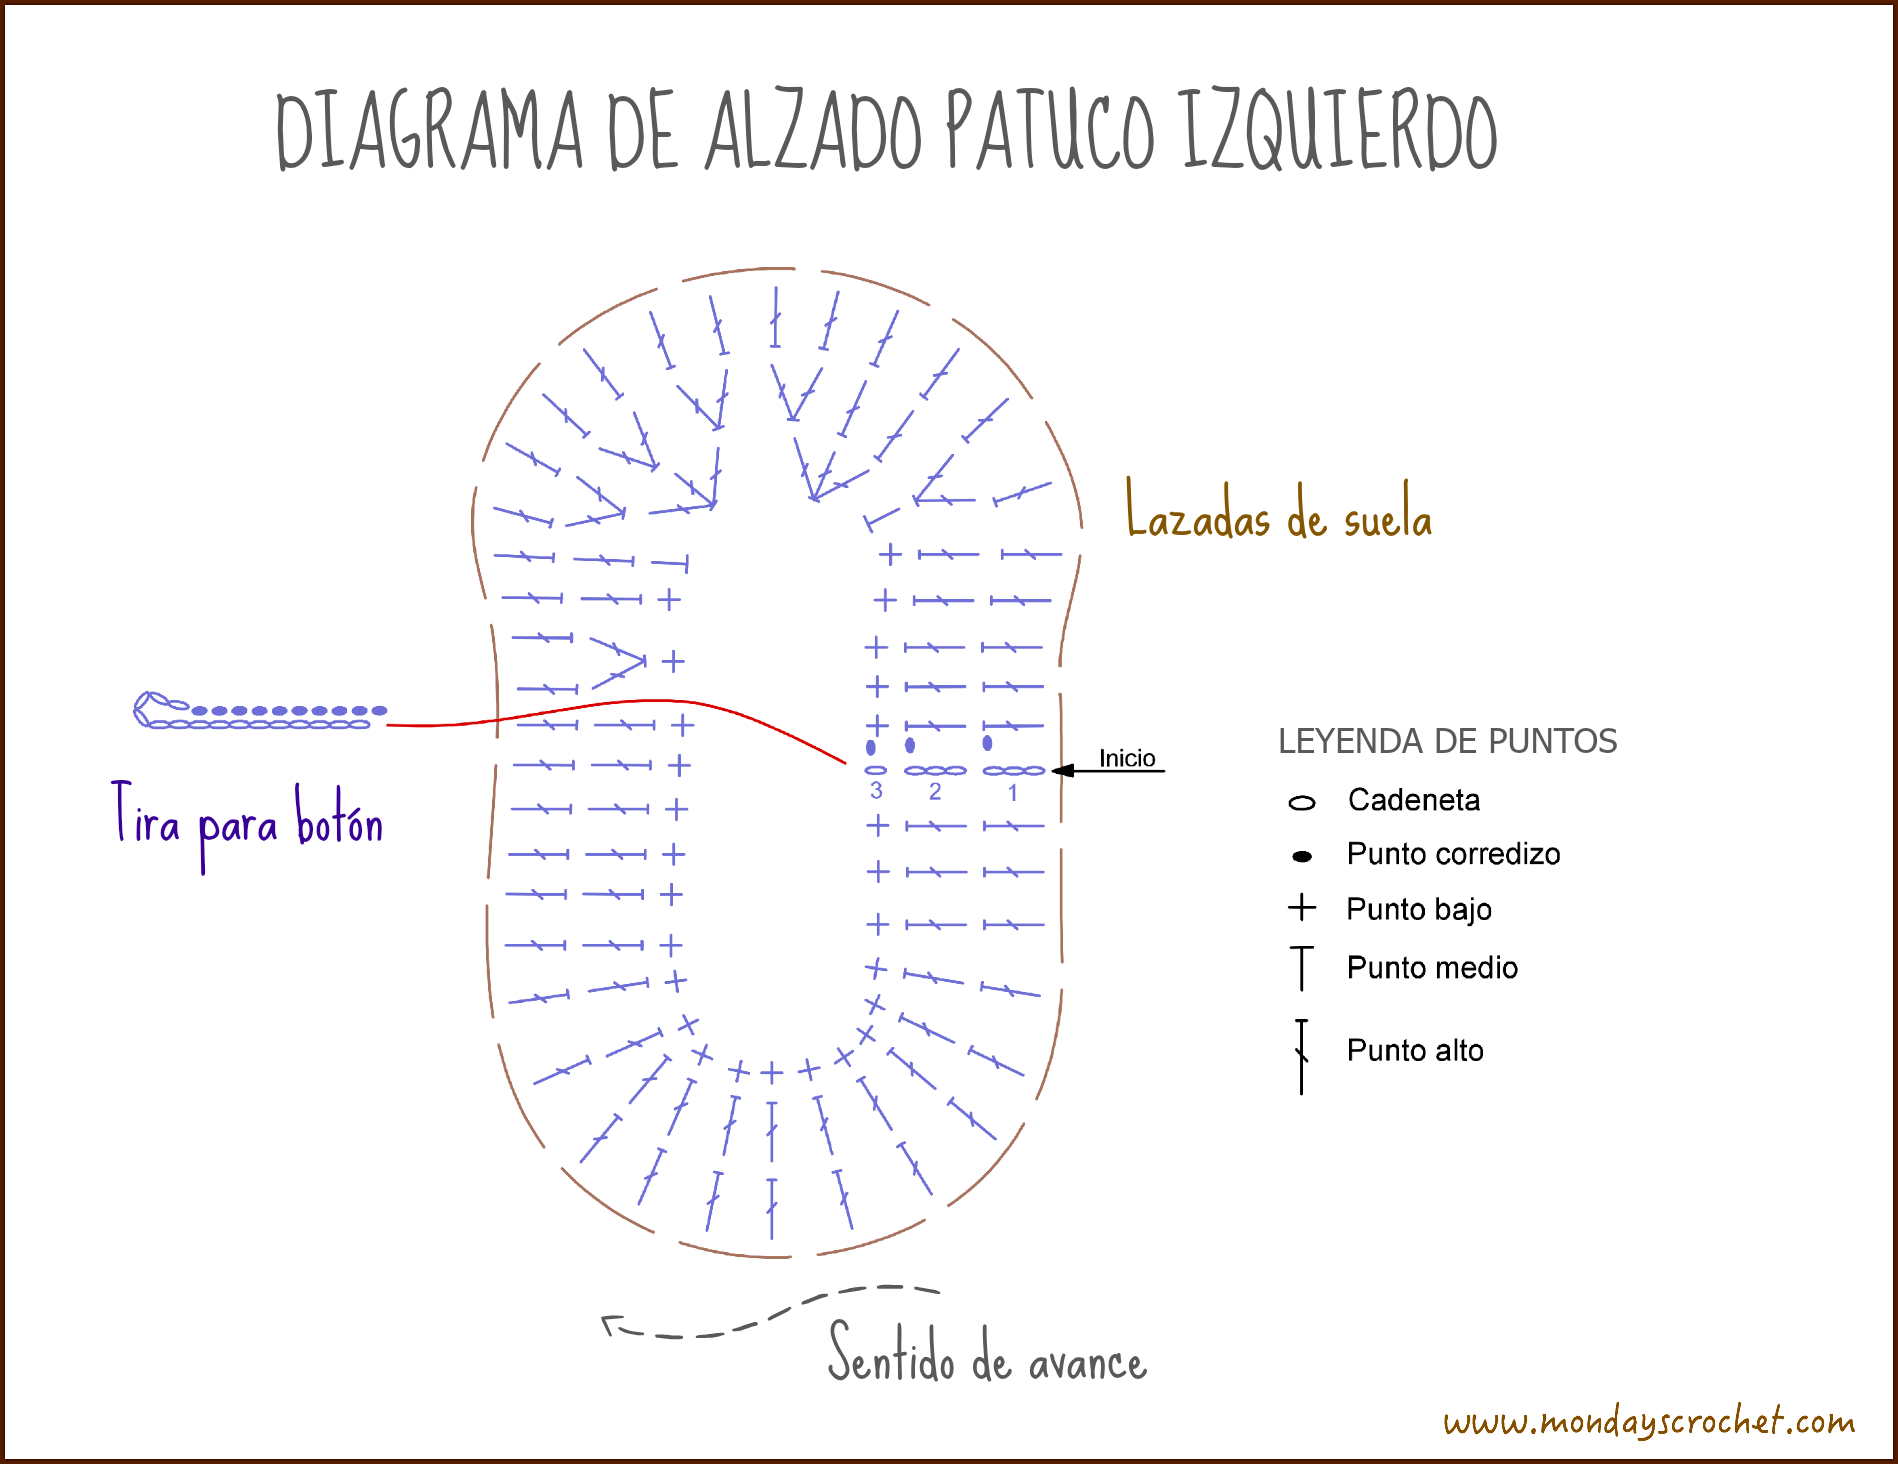
PATUCO IZQUIERDO / BABIES LEFT BOOTIE
Para tejer el alzado del patuco izquierdo contamos 6 puntos desde la c.a.d. inicial en la última vuelta de la suela, por el revés y dejando las dos lazadas vistas de la suela del patuco.
To make the elevation of the left bootie count 6 stitches from the initial c.a.d. of the last row of the sole, inside out and again leaving the two loops of the sole visible.
VUELTA 1.- Tejer 3 c.a.d. de subida, 41 p.a. y cerramos en la c.a.d. de subida con 1 p.c.
VUELTA 2.- 3 c.a.d. de subida, 20 p.a. en cada p.a. de la vuelta anterior, disminución de 2 p.a., 2 p.a., 4 disminuciones de 2 p.a., 2 p.a., 1 disminución de 2 p.a., 5 p.a. y cerramos en la c.a.d. de subida con 1 p.c.
VUELTA 3.- 1 c.a.d. de subida, 21 p.b. en cada p.a. de la vuelta anterior, 1 p.m., 2 disminuciones de 3 p.a., 1 p.m., 5 p.b. y cerramos en la c.a.d. de subida con 1 p.c.
ROW 1.- 3 ch to start the row, 41 dc and finish of with a sl st.
ROW 2.- 3 ch to start the row, 20 dc in each dc of the previous row, decrease of 2 dc, 2 dc, 4 decreases of 2 dc, 2 dc, 1 decrease of 2 dc, 5 dc. and finish off with a sl st.
ROW 3.- 1 ch to start the row, 21 sc in each dc of the previous row , 1 hdc, 2 decreases of 3 dc, 1 hdc., 5 sc. and finish off with sl st.
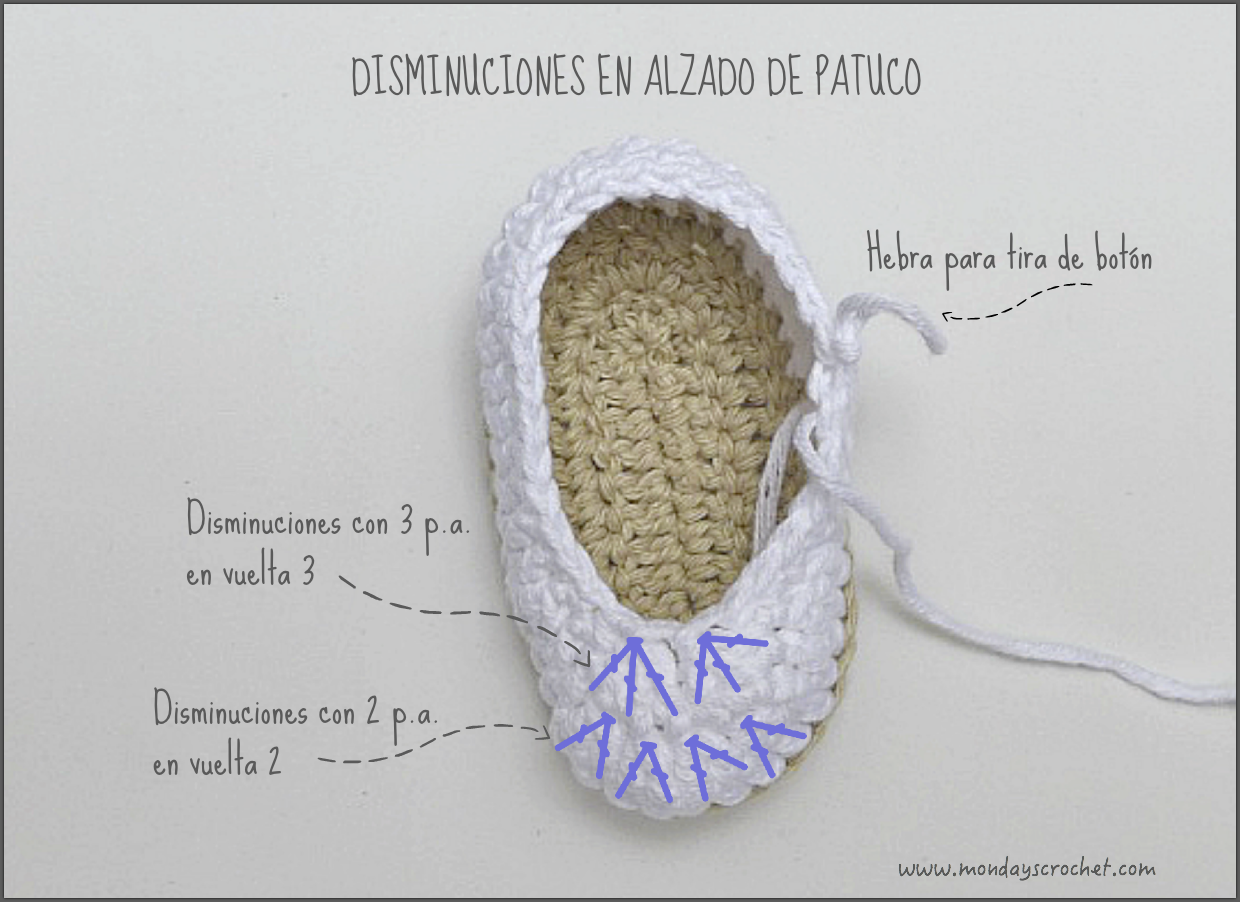
En el siguiente gráfico podéis ver la distribución de las disminuciones centrales del patuco derecho.
In the following chart you can see the distribution decreases towards the centre of the right bootie.
PASO 4.- TEJER TIRA PARA ABROCHAR EL PATUCO / STEP 4. MAKE A LACE TO FASTEN THE BOOTIES
Cuando terminamos de hacer el alzado no cortamos el hilo. Tejemos 15 c.a.d., 1 p.c. en la septima c.a.d. a partir de la aguja, 9 p.c. en la c.a.d. y 1 p.c. en el alzado del patuco.
No cortamos el hilo y comenzamos a hacer el remate del patuco.
When the elevation is complete do not cut the thread. Make 15 ch, 1 sl st. in the 7 ch from the hook, 9 sl st in the ch and 1 sl st in the elevation of the bootie.
Begin to make the top of the bootie.
PASO 5.- REMATE CON PUNTO DE CANGREJO DE PUNTO BAJO EN EL BORDE DEL PATUCO / STEP 5. FINISH OFF THE BORDER WITH CRAB STITCH
Tejemos un remate con punto de cangrejo de punto bajo en el borde de los patucos. En el siguiente vídeo podéis ver como se realiza este sencillo acabado.
Make a border with sc crab stitch on the edge of the booties. In the following video you can see how to make this simple finish.
PASO 6.- REMATAR HILO DEL ALZADO DEL PATUCO / STEP 6. FASTEN THE THREAT
Una vez terminado de tejer el remate del borde del patuco con un punto bajo de cangrejo, ocultamos el hilo sobrante del alzado con una aguja lanera.
Once the border is complete hide the thread with a needle.

PASO 7.- COSER BOTÓN / STEP 7. SEW BUTTON
Nosotras hemos elegido un botón forrado de tela. Podéis utilizar un botón de pasta o un automático pequeño.
We have chosen a button covered with fabric – you can use a normal button or a small stud.
PASO 8.- TEJER 2 CORAZONES PEQUEÑOS / STEP 8. MAKE SMALL HEARTS
Hemos utilizado el diagrama de un sencillo corazón que la empresa de lanas Katia propone y que podéis ver en este enlace corazón lanas Katia.
We have used the diagram of a simple heart that Katia wool company suggested – you can see this at the following link heart Katia wool.
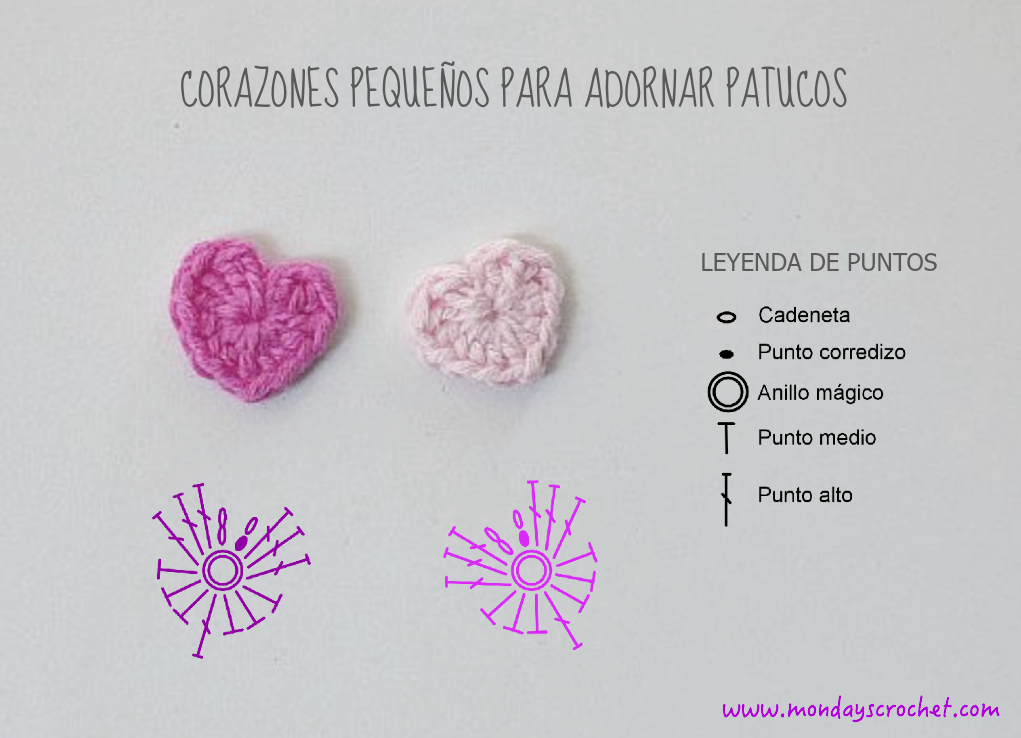
CORAZÓN PEQUEÑO
VUELTA INICIAL: Anillo mágico.
VUELTA 1: Subir con 2 c.a.d. Tejer dentro del anillo mágico 3 p.a. 3 p.m. 1 p.a. 3 p.m. 3 p.a. 1 c.a.d. y cerrar con 1 p.c.
SMALL HEART
INITIAL ROW: Magic ring
VUELTA 1: 2 ch to start the row. In the magic ring make: 3 dc, 3 hdc, 1 dc, 3 hdc, 3 dc, 1 ch and finish off with 1 sl st.
PASO 9.- COSER LOS CORAZONES AL PATUCO / STEP 9. SEW HEARTS TO THE BOOTY
Hemos prendido los corazones con alfileres; el de color rosa claro a un lado y el rosa fucsia en el centro del patuco solapando 2 mm. A continuación cosemos los corazones con hilo de coser blanco.
Estos sencillos patucos son una monada y un regalo muy especial.
We have pinned on the hearts; the pink on one side and fuchsia in the center of the bootie overlapping 2 mm. Then we sewed them using white thread.
We think that these simple booties are cute and could make a very special gift.

Pingback: Patucos para Bebe [Crochet Intermedio] > Tejidos Crochet
Hola. Son preciosos. Me encantan. Te pongo en favoritos…
http://www.cositasparavictoria.com
Me gustaMe gusta
Muchas gracias! Si te animas a tejerlos cuéntanos tus dudas y resultado.
Me gustaMe gusta
Hola! Me encantan estos patucos pero he intentado hacelos para mi pequeña y son muy pequeños. Mi niña tiene 4 meses y necesitaria hacerle unos mas grandes. He visto el grafico con los distintos tamaños de la suela pero, y el resto del patron? No teneis patrones para tamaños mas grandes?
Gracias!
Me gustaMe gusta
Raquel, estos patucos son para recién nacido. Envíanos al correo electrónico mondayscrochet@outlook.es tu dirección indicando en el asunto patuco 4 meses y te enviamos el patrón.
Me gustaMe gusta
Estupendo! Gracias!
Me gustaMe gusta
Bueno….chicas….que ternura!!! Yo lo de tener bebes ya son palabras mayores…pero quiero unos para regalar!!! Ya os iré diciendo sí para niño o niña!! Gracias por seguir conservando el hacer cosas con gusto exquisito.
Me gustaMe gusta
El sábado en el II Encuentro empezamos a hacerlos. No sé si nos echarán del Café, pero el patuco te lo llevas hecho.
Me gustaMe gusta
Qué cosa tan bonita!!! Me gustan muchísimo!
Me gustaMe gusta
Los puedes hacer para las muñecas de tu pequeña y se vuelve completamente loca.
Me gustaLe gusta a 1 persona
Qué buena idea!!!
Me gustaMe gusta
Me lo apunto para cuando saque un rato!! A ver si así me pongo a tejer!!
Me gustaMe gusta
Estas prendas rápidas y resultonas animan mucho a tejer. Cuéntanos cómo te han quedado!
Me gustaLe gusta a 1 persona
Tengo que sacar un ratito…prometo que si me pongo a ello os muestro el resultado !
Me gustaMe gusta
Qué monada por favor! Nunca os han dicho lo que os curráis cada entrada? Qué lujo, y eso que no sé apreciar lo que hacéis por mi total desconocimiento… Besitos
Me gustaMe gusta
Nuestro objetivo es hacer posts que los visitantes a nuestra página puedan realizar. Nos anima mucho que lo aprecies.
Me gustaLe gusta a 1 persona