Queríamos hacer una funda para una máquina de coser pero no encontrábamos el patrón adecuado, así que se nos encendió la luz y pensamos en sacar el patrón de la funda de plástico que traía nuestra máquina. Y aquí está el TRUCO: “si cortas la funda de plástico tienes el patrón perfecto para hacer una y mil fundas a medida”.
We wanted to make a cover for the sewing machine but we couldn’t find the proper shape, so we took the original plastic cover of the machine as a template and made a new cover from that template in material. And here’s the TRICK: “you now have the perfect pattern to make as many custom made covers as you wish”.

Eso es exactamente lo que hemos hecho.
And that is exactly what we did.
PASO 1.-Cortamos el plástico protector.
PASO 2.- Lo extendemos sobre la tela que queremos utilizar para la funda y lo prendemos con alfileres.
PASO 3.- Marcamos y cortamos el contorno dejando 2 cm para las costuras.
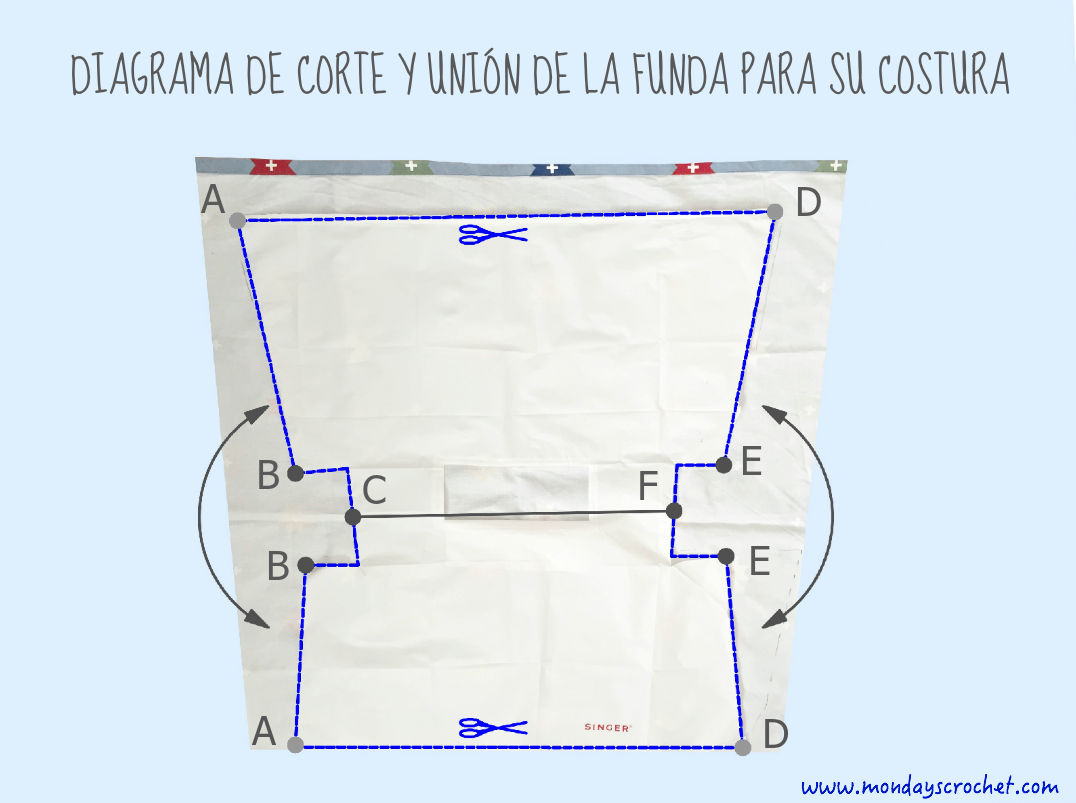
PASO 4.- Encaramos los lados siguiendo el diagrama unimos: A-A, B-B y B-C para un lado y D-D, E-E y E-F para el otro lado. Cosemos a máquina con un pespunte.
PASO 5.- Rematamos las costuras abiertas a máquina con un zig-zag.
PASO 6.- Hacemos un dobladillo de 2 cm en la parte inferior de la funda y lo cosemos a máquina con un pespunte.
PASO 7.- Cosemos a mano un festón de 1 cm de alto y 1.5 cm de separación entre puntadas en la base de la funda.
STEP 1. Cut the plastic protector.
STEP 2. Extend it on the material that we want to use for the cover and hold it with pins.
STEP 3. Mark and cut the outline, leaving 2 cm for seams.
STEP 4. follow the diagram and sow: a-a., b-b and b-c to one side and d-d, e-e and f for the other side. Sew on the sewing machine.
STEP 5. Make a zig-zag in the open seams.
STEP 6. Make a hem of 2 cm at the bottom of the cover and sew using the sewing machine.
STEP 7. Sew a blanket stitch 1 cm high and 1,5 cm separation between stitches at the base of the cover.

En este vídeo podéis ver cómo se hace el Punto festón.
In this video you can see how to make a blanket stitch.
La funda está terminada. Ahora queremos darle nuestro toque de crochet con esta sencilla terminación.
The cover is finished.
TERMINACIÓN DE CROCHET PARA FUNDA DE MÁQUINA
GRADO DE DIFICULTAD
Bajo
PUNTOS EMPLEADOS
- Punto bajo (p.b.)
- Punto alto (p.a.)
- Punto alto doble (p.a.d.)
DIFFICULTY
Easy
STITCHES
- Single crochet (sc)
- Double crochet (dc)
- Treble crochet (tr)
Podéis ver un vídeo de todos estos puntos en la CLASE 3.- PUNTOS BÁSICOS DE CROCHET de nuestra ESCUELA DE CROCHET.
You can see a video of all these stitches in CLASS 3 – BASIC STITCHES OF CROCHET from our SCHOOL OF CROCHET.
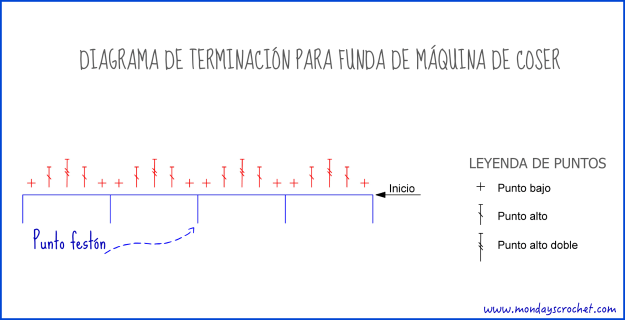
VUELTA 1: Tejer en el espacio de cada punto de festón 1 p.b., 1 p.a., 1 p.a.d., 1 p.a. y 1 p.b.
VUELTA 1: In each space of the blanket stitch 1 sc, 1 dc, 1 tr, 1 dc. y 1 sc.
Estamos muy contentas con el resultado y con la posibilidad de renovar nuestra funda cuando queramos.
We are happy with the result and with the possibility of making a new cover whenever we want.
