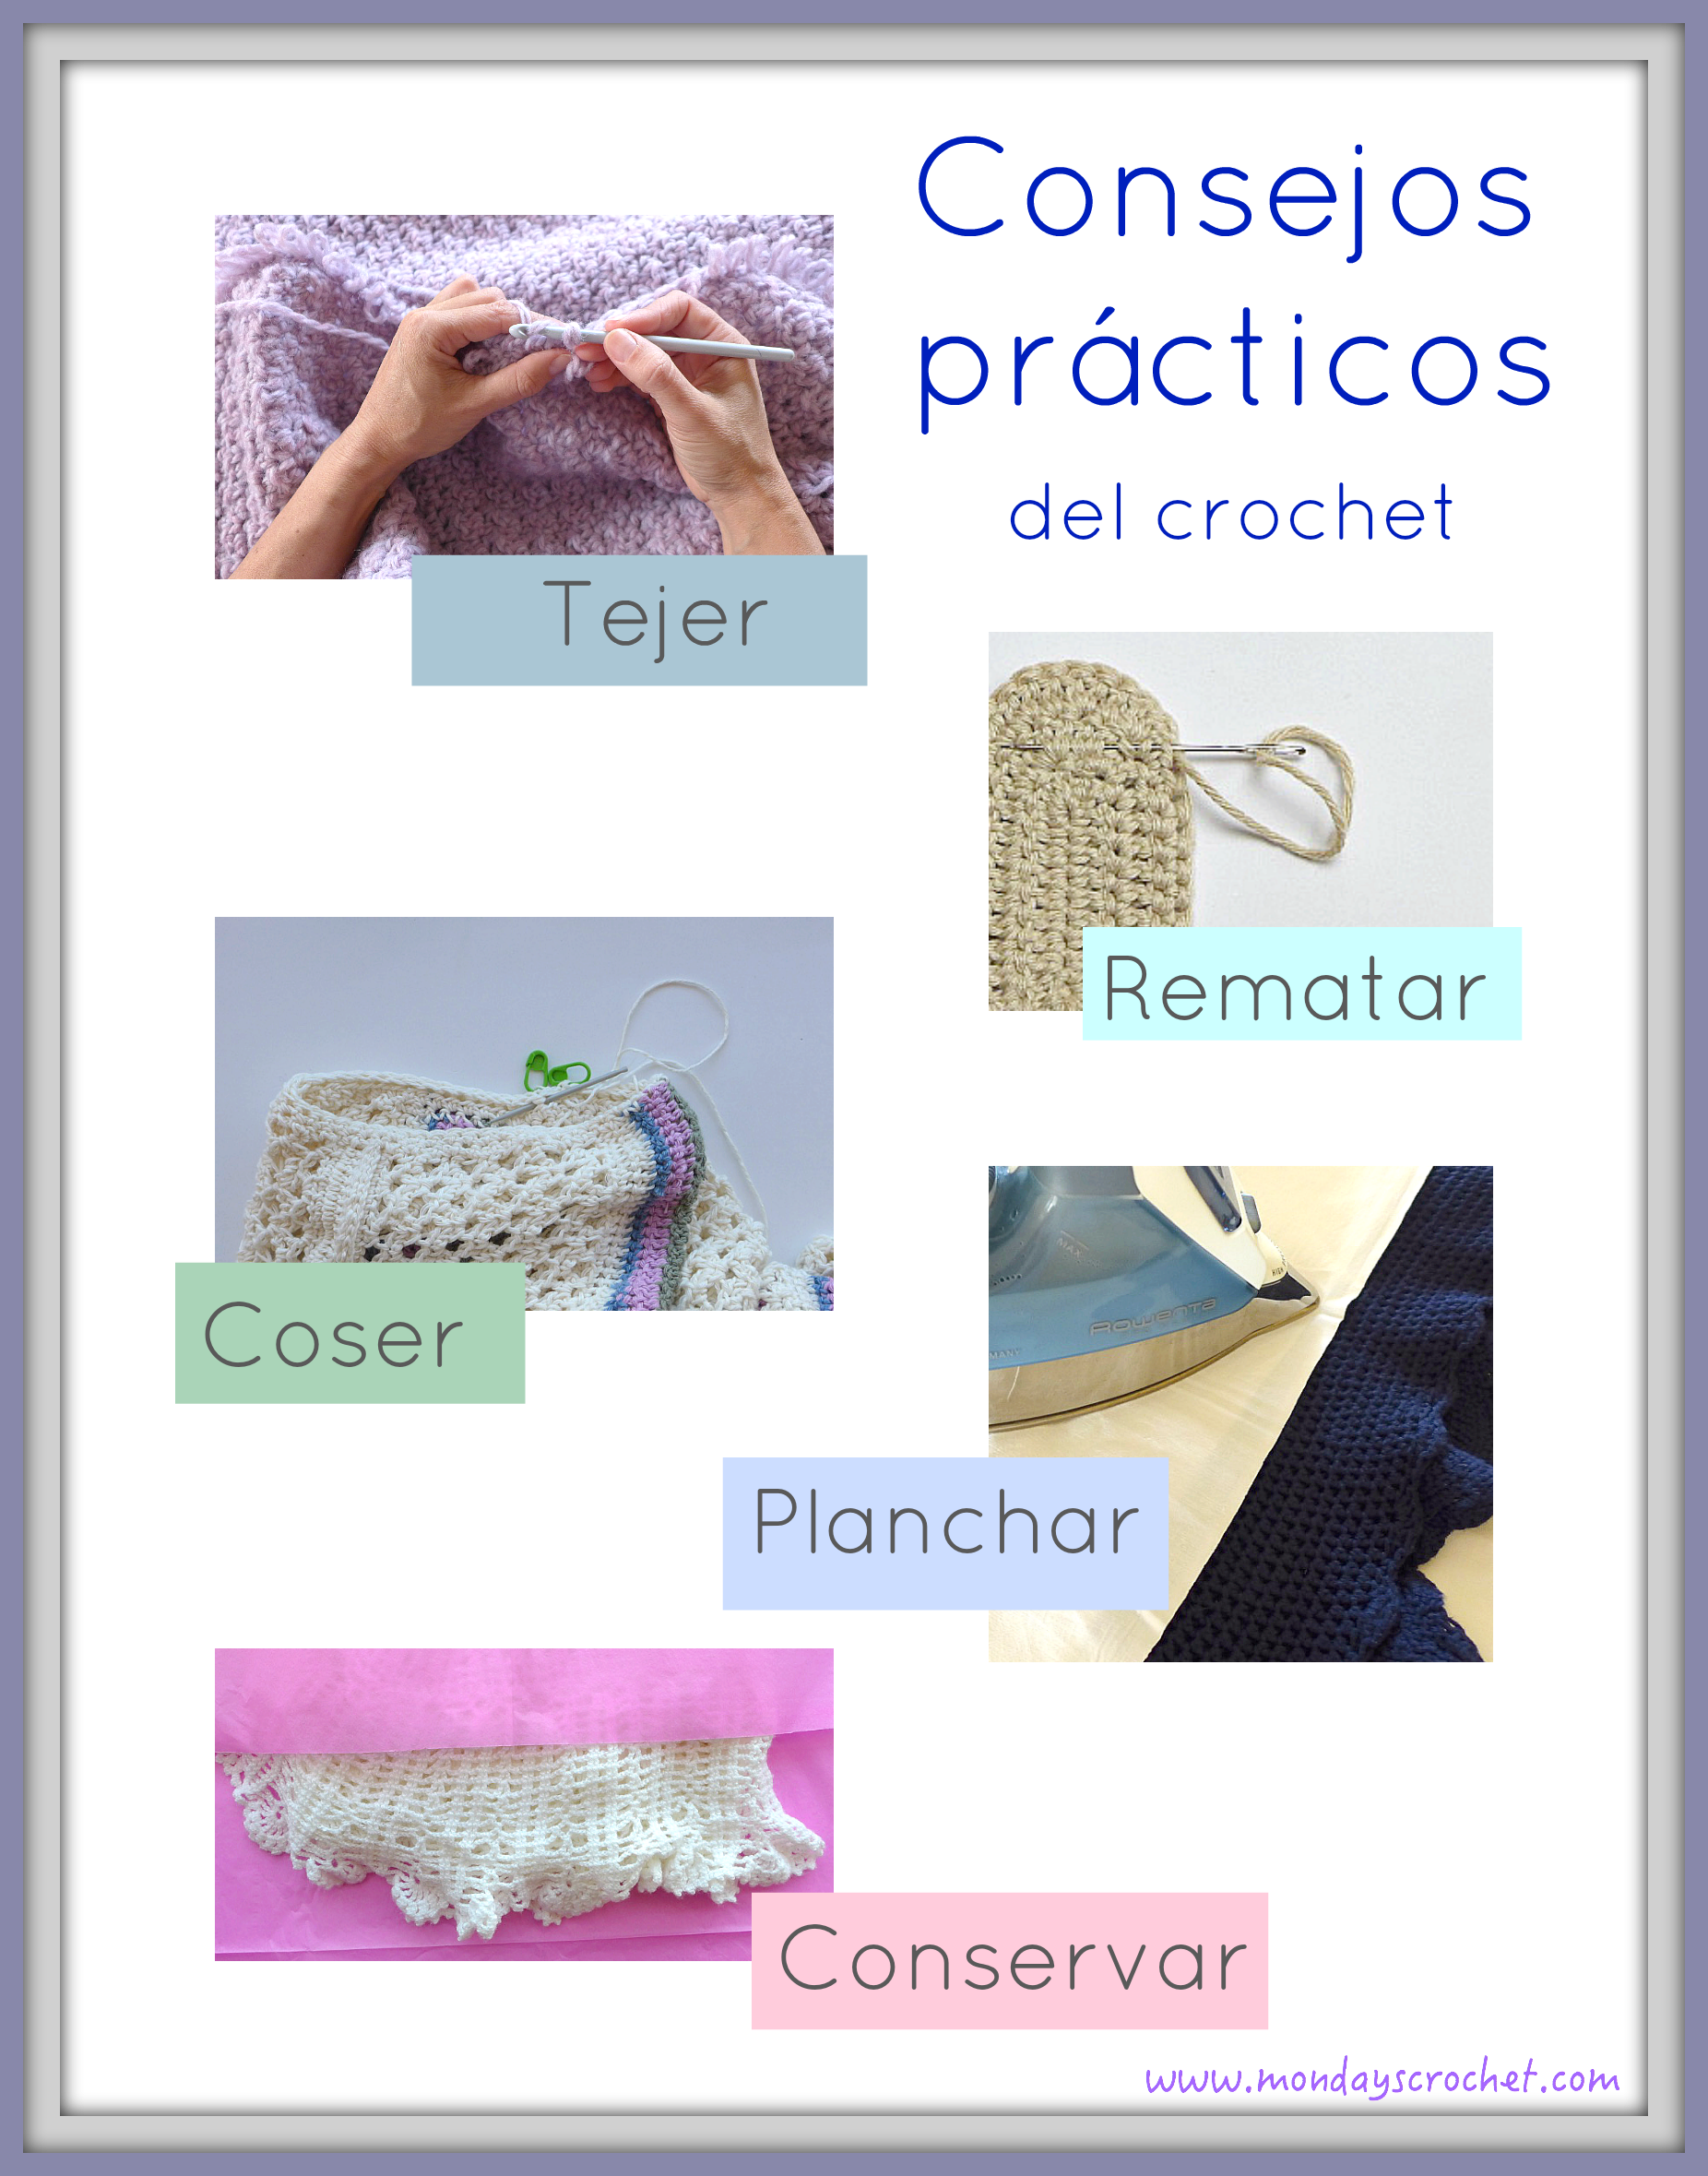
En esta clase os proponemos algunos consejos para tejer, rematar, coser, planchar y conservar vuestra prenda de crochet.
In this class, we will be suggesting some tips for crocheting, finishing, sewing, ironing and caring for your crochet garment.
DAR LA VUELTA A LA LABOR / TURNING THE WORK OVER
En los trabajos de tejido lineal debemos dar la vuelta a la labor para comenzar una vuelta nueva. Estableceremos un criterio para darle la vuelta siempre en el mismo sentido. Si lo hacemos en el sentido de las agujas del reloj, por ejemplo, lo haremos igual en todas las vueltas.
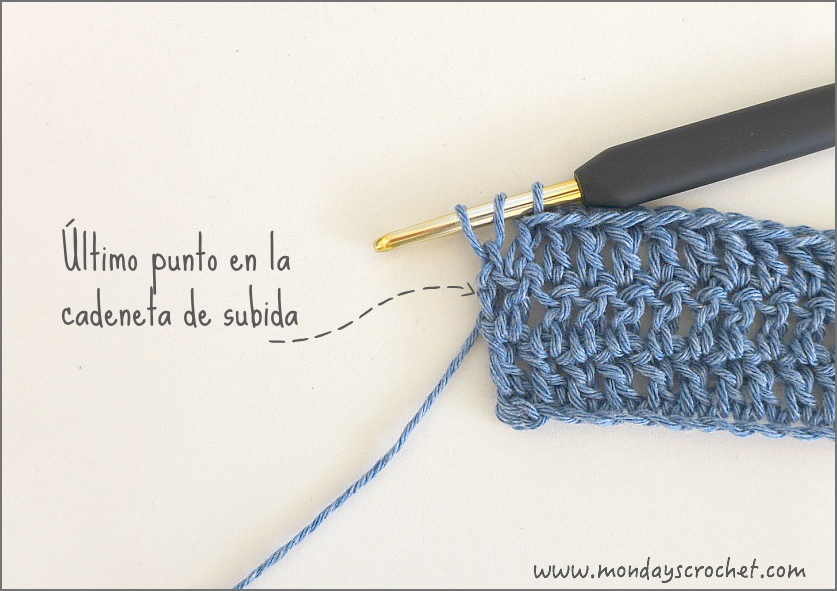
A continuación haremos las cadenetas de subida. Podéis ver un cuadro en la CLASE 1.- PUNTOS BÁSICOS. Estas cadenetas de subida son el primer punto de la vuelta. En nuestra labor podemos hacer el punto inmediato a las cadenetas de subida o saltarlo. Debemos tener la precaución de hacerlo siempre con el mismo criterio. Es decir; hacerlo en todas las vueltas o no hacerlo en ninguna.
In lineal work we must turn to the work over when starting a new row. We will establish a criteria to turn it always in the same direction. If we do it clockwise, for example, you must continue the same methodology for all rows.
We make the chains to start a new row. You can see a picture in CLASS 1-Basic stitches. These chains are the first stitch of the new row. We can do it the first stitch or the next one in. We must be careful to continue with the same methodology for all subsequent rows.

Si no tejemos el primer punto junto a la cadeneta de subida, debemos recordar tejer el último punto de la vuelta correspondiente a las cadenetas de subida de la vuelta anterior. Este es un error que se comete con mucha frecuencia y la labor toma forma trapezoidal por esta causa.
If you have crocheted the first stitch, you must remember not to crochet the last stitch of the row. Conversely, If you have crocheted the second stitch, you must remember to crochet the last stitch of the row. If these rules are not followed the work would take on a trapezoidal shape.
CAMBIAR DE COLOR / CHANGE COLOUR
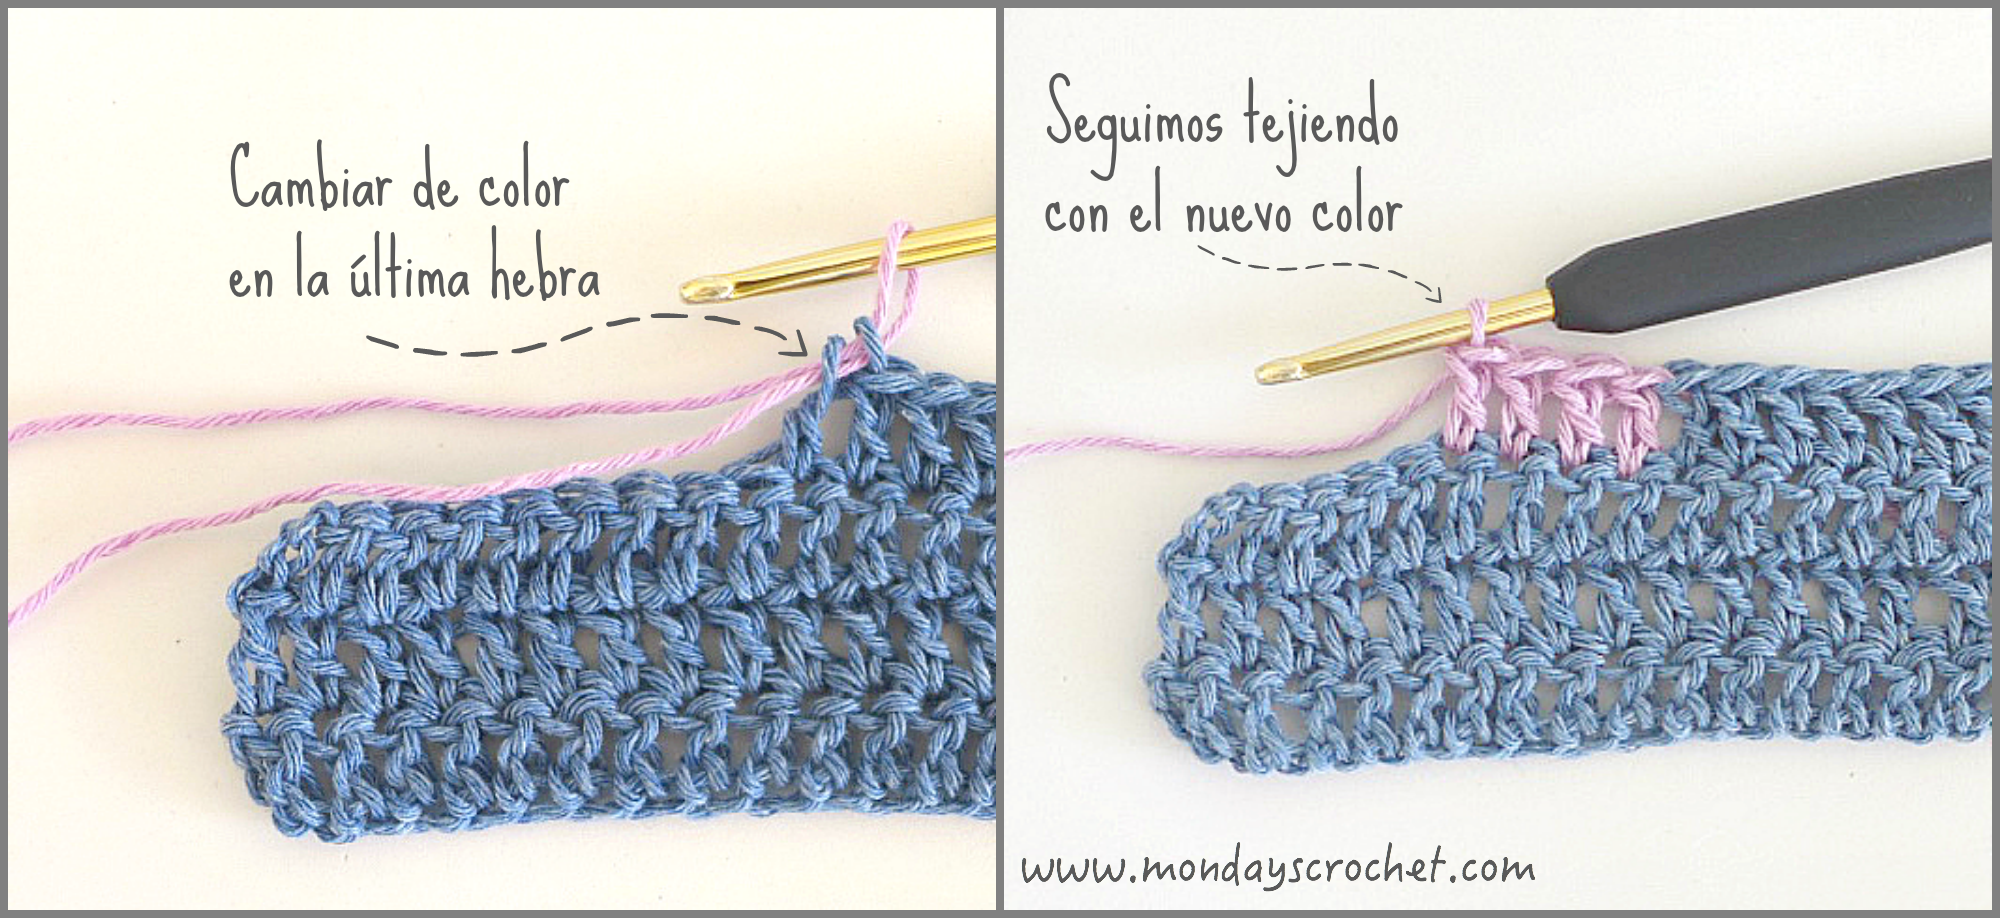
Para cambiar de color en cualquier punto , ya sea bajo, medio, alto… Debemos recordar echar el hilo con el nuevo color en la última hebra de la lazada del punto.
To change the color of any stitch, be it single, half-double or double crochet we must remember to take the thread with the new color in the last strand of the loop of the stitch.
AL FINAL DE LA VUELTA / END OF THE ROW
Para comenzar la siguiente vuelta con un nuevo color debemos incorporarlo en la última hebra del último punto. Echaremos hebra del nuevo color y la sacaremos por las dos últimas lazadas de ultimo punto.
To start the next row with a new color, incorporate it into the last strand of the last stitch. Yarn over with the new color and pull out the last two loops of the previous stitch.

EN CUALQUIER PUNTO DE LA VUELTA / IN ANY PART OF THE ROW
Lo incorporaremos de manera idéntica al apartado anterior y seguiremos tejiendo en la misma vuelta.
We will incorporate it as mentioned in the previous section and continue crocheting in the same row.
CONTADOR DE VUELTAS / ROW COUNTER
Hemos diseñado un contador de vueltas muy práctico y sencillo. La columna derecha pertenece a las unidades y la izquierda a las decenas. Moviendo los clips sabéis la vuelta en la que tejéis.
We have designed a very practical and simple row counter. The right column for units and the left one for tens. By moving the clips you will know in which row you are.
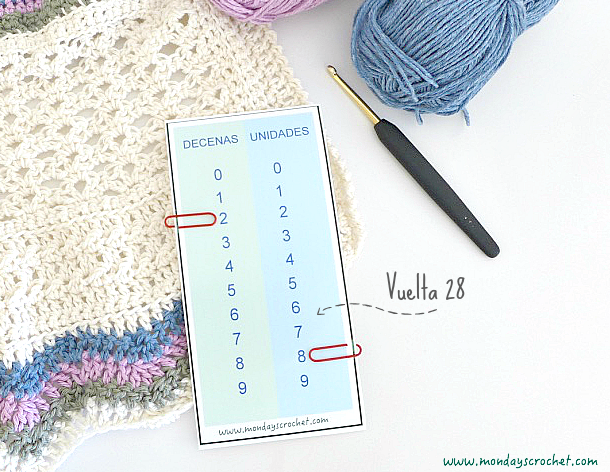

Os animamos a imprimir este contador de vueltas en cartulina o papel fotográfico y ayudaros de unos clips para ir marcando cada vuelta. Veréis que es de gran utilidad.
We encourage you to print this row counter on cardboard or photographic paper and use paper clips to record the rows. You will see that it is very useful.
DERECHO DE UNA PRENDA / RIGTH SIDE OF THE GARMENT
El derecho de la prenda lo determina la primera vuelta de la labor.
The right hand side of the garment is determined by the first row.
CERRAR Y REMATAR LA LABOR / FINISH OFF AND FASTEN THE WORK
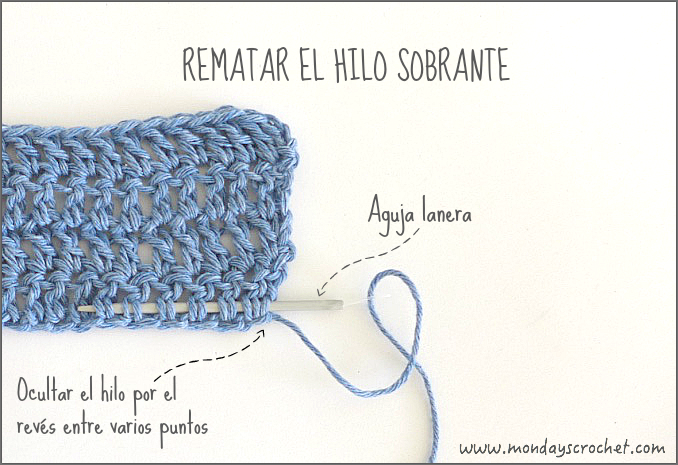
Cuando hemos terminado el último punto de la última vuelta, pasaremos la hebra por la lazada y tiraremos suavemente unos 10 cm. Cortaremos el hilo. En este momento debemos rematar el hilo sobrante.
When we have finished the last stitch of the last row, pass the thread through the loop and gently pull out about 10 cm. and then cut the thread. At this point we must hide the excess thread.

Para ocultar el hilo debemos enhebrar una aguja lanera. Por el revés de la labor, pasaremos la aguja entre varios puntos de uno en uno. Si nuestra labor tiene muchos calados, seguiremos los dibujos en diagonal para no pasar la hebra entre los calados. Por último cortaremos el hilo.
To hide the thread we thread it through a wool needle. On the other side of the work, pass the needle between several stitches one by one. If the work is ‘loose’, follow the pattern diagonally BUT do to not pass the thread where it may be visible. Finally cut the thread.
CONSEJO CUANDO SE ACABA EL HILO / ADVICE WHEN THE THREAD IS FINISH
Intentaremos evitar que se termine el hilo en medio de una vuelta. Remataremos el hilo en el comienzo de la vuelta y comenzaremos la siguiente con un nuevo ovillo. Nunca haremos un nudo en nuestra labor.
Try to avoid ending the thread in the middle of a row. Finish the thread at the beginning of the row and start the next with a new ball. Try to prevent making a knot in the work.
CÁLCULO DE PUNTOS INICIALES. MEDIR UNA MUESTRA / CALCULATE THE AMOUNT OF CHAINS. MEASURING A SAMPLE
Para calcular la cadeneta inicial de una labor, debemos tejer una muestra con la aguja que vamos a utilizar y el punto elegido.
Vamos a realizar un ejemplo tejiendo 10 puntos y 4 vueltas.
To calculate the initial chain of a work, crochet a sample with the hook that we will be used and the chosen pattern.
Let’s make a sample crocheting 10 chains and 4 rows.

Si para nuestra muestra de 10 puntos hemos obtenido 7 cm y por ejemplo, necesitamos que nuestra prenda mida 50 cm debemos hacer «x» cadenetas iniciales.
If the sample of 10 chains measures 7 cm and for example we need our work to measure 50 cm we must make “x” initial chains. (see example below)
Con esta sencilla regla de tres podéis ver más claramente nuestro ejemplo:
With this simple rule of three, it makes it more clear:
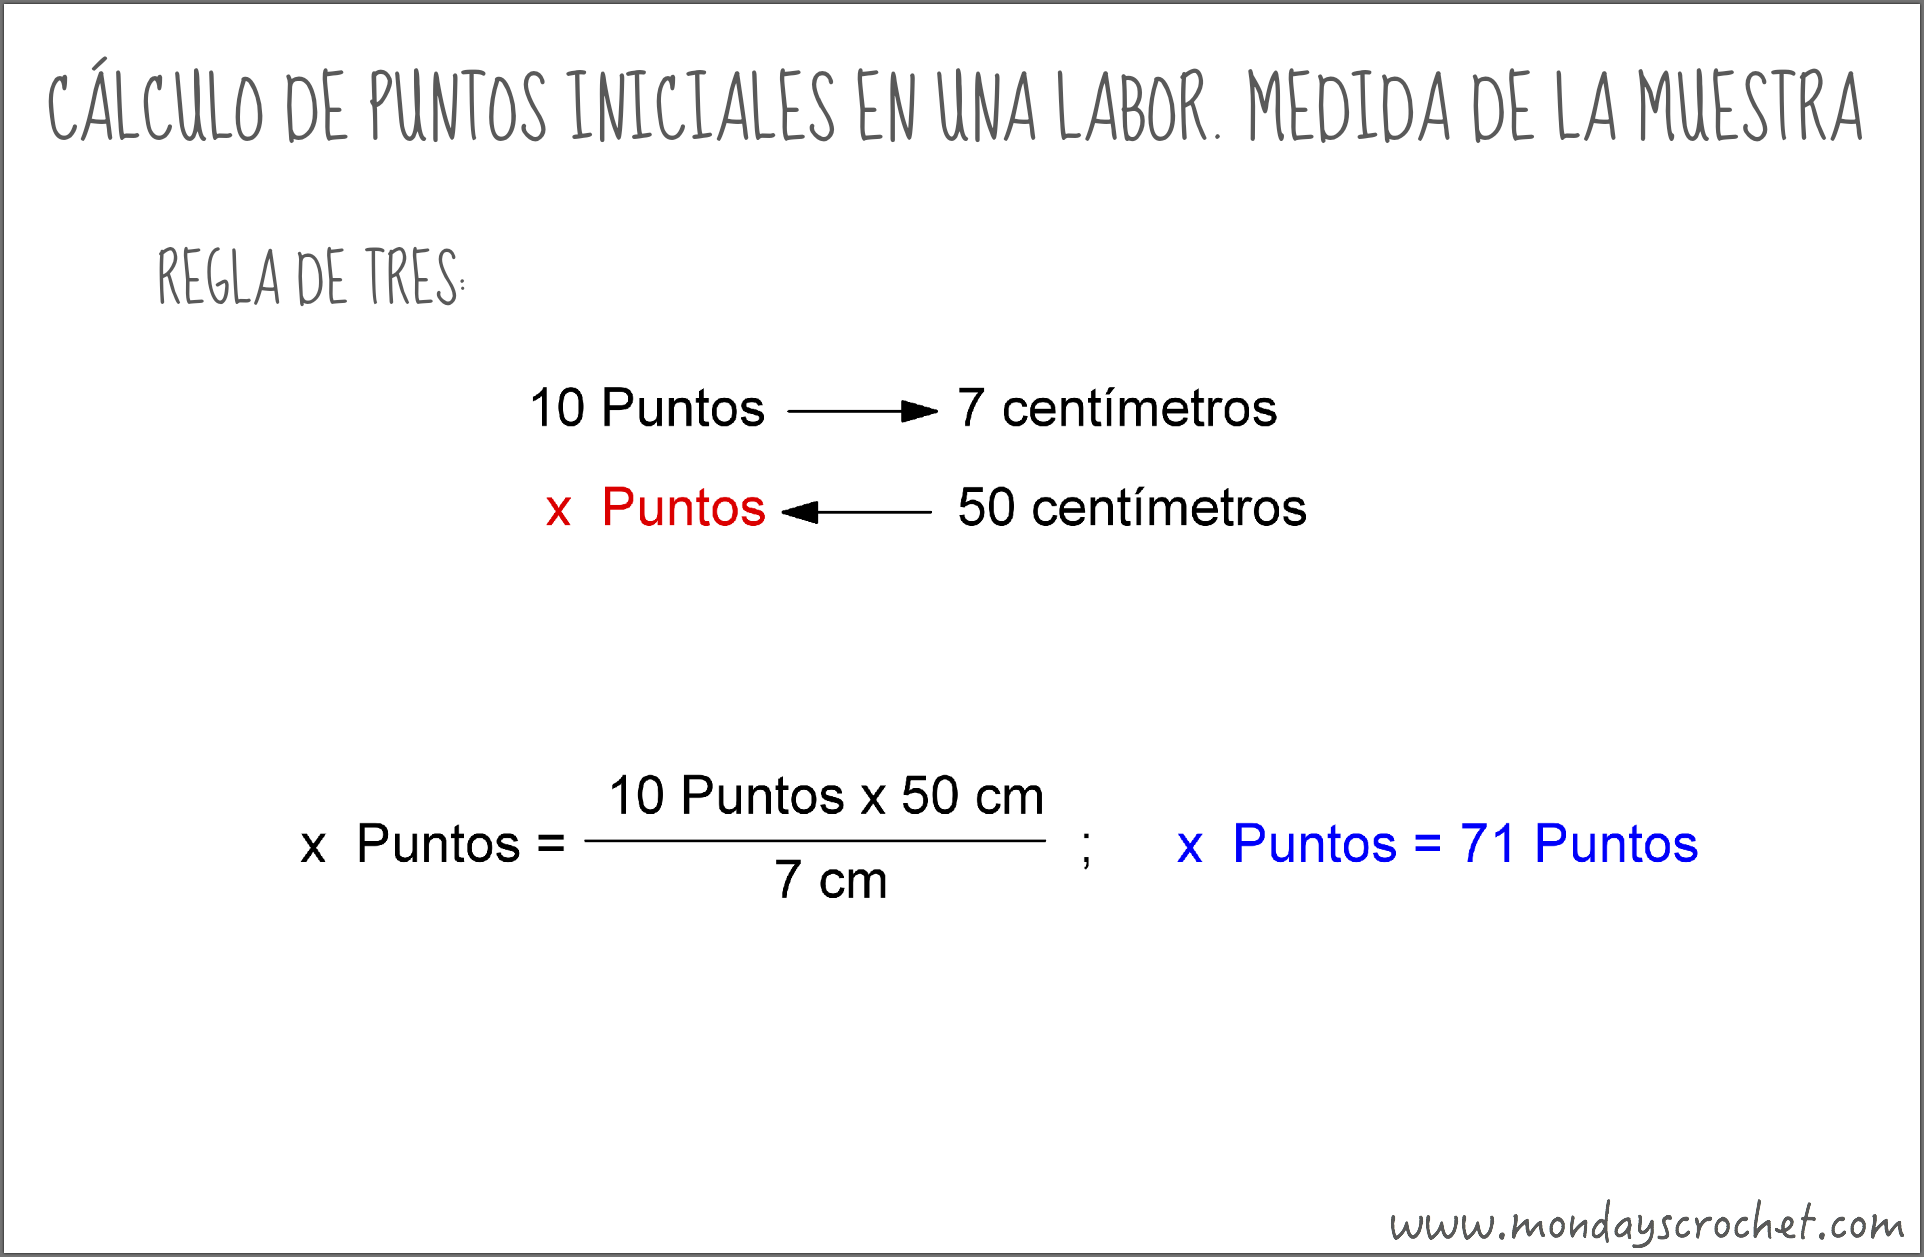
Multiplicaremos 10 puntos por 50 centímetros y dividiremos entre 7 centímetros. Obteniendo 71 cadenetas iniciales.
Multiply 10 chains by 50 cm and divide by 7 centimeters. Obtaining an initial number of 71 chains.
PLANCHADO O BLOQUEO DE LAS PRENDAS DE CROCHET / IRONING A CROCHET GARMENT
El primer planchado de una prenda se hace antes de hacer las costuras de unión. Para ello:
1. Pondremos el lado derecho de la prenda hacía abajo.
2. Prenderemos con alfileres nuestra prenda a la tabla de la plancha.
3. Pondremos un paño limpio humedecido o echaremos agua de la plancha sobre el paño.
4. Plancharemos varias veces presionando muy suavemente.
5. Dejaremos secar totalmente la prenda antes de quitar las alfileres.
Volver a planchar cuando terminemos las costuras.
The initial ironing of the garment is made before the union of the seams. Like this:
1. Put the right hand side of the garment face down.
2. Pin the garment to the iron board.
3. Put a clean but slightly damp cloth or pour water from the iron on the cloth.
4. Iron several times pressing gently.
5. Leave dry the garment completely before removing the pins.
Iron again when the garment is complete.
HACER COSTURAS / MAKING SEAMS
Hay muchas formas de hacer una costura para unir dos prendas. Nosotras os vamos a mostrar las tres más utilizadas y que a nuestro juicio quedan mejor.
There are many ways to make a seam to join two garments. We are going to show the three most commonly used and those we believe are the best.
COSTURA CON PUNTO CORREDIZO / SLIP STITCH SEAM
Esta costura se hace con una aguja de crochet. Se encaran los dos lados derechos de la prenda y se hace un punto corredizo, con muy poca tensión, por debajo de las dos lazadas de los últimos puntos.
This seam is completed with a crochet hook. With the right hand sides of the garment facing each other make a slip stitch, with very little tension, below the two loops of the last stitches.

Podéis ver este punto en el siguiente vídeo:
You can see this stitch via the video link below:
Recordad que es importante que la costura tenga muy poca tensión para que no quede tirante.
Remember that it is important that the seam has very little tension i.e. not tight.
COSTURA EN ZIG-ZAG / ZIG-ZAG SEAM
Esta costura se realiza con una aguja lanera. Se encaran los dos lados derechos de la prenda y se cose por el revés. Consiste en pasar la aguja por debajo de la dos lazadas de la última vuelta manteniendo muy poca tensión. Se utiliza en prendas delicadas como las de bebés o puntos con dibujos muy calados o ligeros.
This seam is made with a wool needle. With the right hand sides of the garment facing each other it is sewn inside out. Pass the needle under the two loops of the last row keeping very little tension. This method is used for delicate baby garments or lace.

COSTURA CON PRESPUNTE / BACKSTITCH SEAM
Esta costura se realiza con una aguja lanera. Se encaran los dos lados derechos de la prenda y se cose por el revés. Consiste en pasar la aguja por debajo de la dos lazadas de los puntos de la última vuelta y hacerlos coincidir cosiendo un presente en cada uno. Se utiliza en prendas que deben quedar fuertemente unidas.
This seam is made with a wool needle. With the right hand sides of the garment facing each other it is sewn inside out. It consists of passing the needle under the two loops of the stitches of the last row and match the stitches. This method is used for garments that must be tightly bound.

CUIDADOS DE LAS PRENDAS DE CROCHET / CARE OF CROCHET GARMENTS
Las prendas de crochet se lavan siempre a mano, se enrollan en una toalla para quitar el exceso de agua y muy bien extendidas se dejan secar en una superficie plana para que no se deformen.
Nunca se colgarán de una percha para evitar que se deformen.
Para proteger nuestras prendas de la humedad se guardarán envueltas en papel de seda o similar.
Crochet garments are always hand washed and then wrapped in a towel to remove excess water then spread out and left to dry on a flat surface to prevent deformation. Never dry it by hanging.
To protect our garments from humidity keep it wrapped in tissue paper or similar.
Esperamos que estos consejos hayan sido de utilidad para que vuestras prendas estén perfectas!
We hope that these tips are helpful to keep the garments in perfect condition!

Buenas tardes.
He visto su blog y me a ayudado muchísimo solo tengo una gran duda y me he confundido toda. Es sobre la tabla de contador de vueltas como se utiliza eso y el cálculo de filas iniciales. Si me podría ayudar con esas dándome un ejemplo sería de muchísima ayuda. De antemano muchas gracias y quedo atenta a su pronta respuesta.
Saludos desde El Salvador
Me gustaMe gusta
Hola Vanessa! Para utilizar el contador simplemente debes poner un marcador en el lado izquierdo de las decenas. Es decir, el 1 será de la vuelta 10 a la 19. Y otro marcador en el lado de las unidades.
Si ponemos un clip o marcador en el lado izquierdo en el 3 y otro clip o marcador en el número 4 del lado derecho, estamos tejiendo la vuelta 34.
Un saludo!!!
Me gustaMe gusta
Pingback: Todas las indicaciones para tejer un poncho de mujer - Crear a Mano
Pingback: COMO HACER CHAQUETA MILITAR DE CROCHET – Manualidades In The World
Pingback: COMO HACER VESTIDO PARA MUJER DE CROCHET Y TUL – Manualidades In The World
Pingback: COMO HACER CHALECO NEGRO CON FLECOS / HOW TO BLACK VEST WITH TASSELS – Manualidades In The World
Pingback: COMO HACER CHAQUETA LARGA DE CROCHET – Manualidades In The World
Pingback: CHAQUETA MILITAR DE CROCHET |
Pingback: VESTIDO PARA MUJER DE CROCHET Y TUL |
Pingback: CHAQUETA LARGA DE CROCHET |
Pingback: PONCHO CASUAL PARA MUJER |
Pingback: CHALECO NEGRO CON FLECOS / BLACK VEST WITH TASSELS |
Completísimo. Muchas gracias 🙂
Me gustaMe gusta
Muchas gracias a ti por seguirnos!!
Me gustaMe gusta
¡Hola artistas! Os invito a que veáis la pequeña dedicatoria que os he hecho en la entrada de hoy, por los 100 seguidores: https://historiastrastudni.wordpress.com/2015/10/07/100-gracias-parte-2-2/ Espero que os guste. Besitos!!
Me gustaMe gusta
Y dices que no sabes hacer manualidades!! Menudo encaje de bolillos.
Que si nos ha gustado? No ha encantado! Es el único momento de paz de todo el texto.
Mil gracias eres la pluma vivaz y creativa de nuestra comunidad.
Me gustaLe gusta a 1 persona
Muchas gracias!! Reconozco que fue complicado meter vuestro nombre sin cambiarle un poco el orden. Espero que me perdonéis la alteración. Seguro que sí porque sois geniales. Desde luego que era el momento en que Lorena se relajaba y disfrutaba comentando y riendo sobre el fin de semana anterior… 🙂 Besitos!!
Me gustaMe gusta
Vaya pedazo de tutorial os habéis currado!! Aunque sinceramente, a mí me resultaba más sencillo hacer una aplicación en la carrera que se dedicara a manejar una base de datos que hacer bien lo que contáis…. Besitos!!
Me gustaMe gusta
A nosotras también nos gustaría escribir con la soltura y desparpajo con el que tu lo haces!!
Me gustaLe gusta a 1 persona
Y en inglés? No ida dais cuenta que entonces seríais demasiado perfectas? 😉 Ya lo hacéis con mucha soltura y desparpajo
Me gustaMe gusta
Ida = os
Me gustaMe gusta