Este divertido y versátil chaleco negro es nuestra prenda estrella de la Primavera. Según hemos ido dándole forma nos ha enamorado. ¡Estamos deseando estrenarlo!
This fun and versatile black vest is our star for spring. In the process of making it we will fall in love with it. We hope you look forward to wearing it for the first time!
TUTORIAL PARA UN CHALECO TALLA 40 / SIZE 40 VEST TUTORIAL
GRADO DE DIFICULTAD
Avanzado
MATERIALES
6 ovillos de 50 g de hilo de algodón negro para tejer con aguja número 4
Agujas utilizadas número 5 y 6
24 cuentas de madera de 7 mm
Marcadores
Aguja lanera para rematar
Tijeras
PUNTOS DE CROCHET UTILIZADOS
- Cadeneta (c.a.d.)
- Punto corredizo (p.c.)
- Punto bajo (p.b.)
- Punto cangrejo de punto bajo (p.can.p.b.)
- Punto bajo pareado (2 p.b juntos)
DIFFICULTY
Advanced
MATERIALS
6 balls of 50g of black cotton for hook number 4
Hook used number 5 and 6
24 wooden beads 7 mm
Markers
Wool neddle
Scissors
STITCHES USED
- Chain (ch)
- Slip stitch (sl st)
- Single crochet (sc)
- Crab stitch single crochet (cs sc)
- Single crochet couplet (2 sc together)

DESCRIPCIÓN DEL PUNTO BAJO PAREADO. REVERSIBLE / COUPLET STITCH DESCRIPTION. REVERSIBLE
La principal característica de este punto es su reversibilidad. Consiste en tejer pares de puntos bajos juntos. Para no disminuir en el número de puntos, se teje 2 veces cada punto. El resultado es una prenda resistente y un acabado anudado muy original.
The main feature of this stitch is its reversibility. It consists of making pairs of stitches. In order not to decrease the number of stitches, each stitch is made twice. The result is a heavy duty garment and a very original knotted finish.

En este vídeo podéis ver cómo se teje este punto.
In the video below you can see how to make this stitch.
Hemos diseñado un patrón para nuestro chaleco cuyas dimensiones son las siguientes:
This is the pattern for the dimensions of the vest:

Comenzamos con una aguja del número 6 por la parte inferior del chaleco.
VUELTA INICIAL: Tejemos 89 c.a.d.
Cambiamos a la aguja número 5 para tejer el resto del chaleco.
VUELTA 1 a 37: Tejemos 1 c.a.d. de subida y en el mismo punto de la c.a.d. de subida tejemos puntos pareados (2 p.b juntos) solapando en el punto anterior. En total 89 p.b. pareados.
Repartimos todos los puntos en tres partes: para la espalda y dos delanteros. Para ello, hacemos la siguiente regla numérica midiendo sobre nuestro chaleco:
Start with hook number 6 at the botton part of the vest.
FOUNDATION ROW: 89 ch.
Change to hook number 5 to make the rest of the vest.
ROW 1 to 37: 1 ch to start the row and in the same stitch make 2 sc together overlapping in the previous stitch. 89 sc couplet stitches in total.
We distribute all stitches in three parts: for the front and for the back. To do this, we make the following numerical rule measuring on our vest:
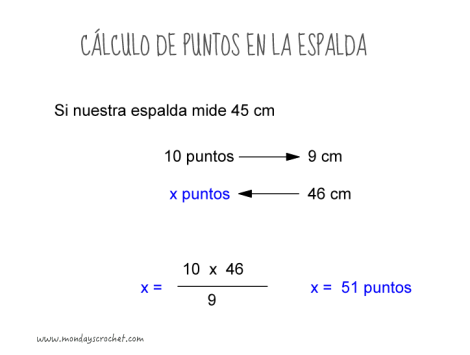
Nuestra espalda mide 46 cm y sobre el chaleco, 10 puntos miden 9 cm. Obtenemos un valor de 51 puntos para la espalda. El resto será para los dos delanteros.
Para un total de 89 puntos, repartimos la espalda y los delantero de la siguiente forma:
Our back measures 46 cm and on the vest, 10 stitches measure 9 cm. We obtain a value of 51 stitches on the back. The rest will be for the front of the vest.
For a total of 89 stitches, distribute the back and the front in the following way:

Ponemos marcadores a 16 puntos para el primer delantero, dejaremos 7 puntos y pondremos otro marcador en el punto 23, otro en el punto 66, dejaremos 7 puntos y el último en el 73.
Place markers after 16 stitches on the first front, count 7 stitches and place another marker in stitch 23, another in stitch 66, Count 7 stitches and place the last marker in stitch 73.
DELANTERO IZQUIERDO / LEFT FRONT
VUELTA 38 REVÉS: Tejemos 1 c.a.d. de subida, puntos pareados (2 p.b juntos). En total 16 p.b.
VUELTA 39 DERECHO: Tejemos 1 c.a.d. de subida y puntos pareados. En total 16 p.b.
VUELTA 40 REVÉS MENGUAR 1 PUNTO EN LA MANGA: Tejemos 1 c.a.d. de subida y puntos pareados. Dejando al final 1 punto sin tejer. En total 15 p.b.
VUELTA 41 DERECHO: Tejemos 1 c.a.d. de subida y puntos pareados. En total 15 p.b.
VUELTA 42 REVÉS MENGUAR 1 PUNTO EN LA MANGA: Tejemos 1 c.a.d. de subida y puntos pareados. Dejando al final 1 punto sin tejer. En total 14 p.b.
VUELTA 43 DERECHO: Por la lazada trasera, tejemos 1 c.a.d. de subida y puntos pareados. En total 14 p.b.
VUELTA 44 REVÉS MENGUAR 1 PUNTO EN LA MANGA: Tejemos 1 c.a.d. de subida y puntos pareados. Dejando al final 1 punto sin tejer. En total 13 p.b.
VUELTA 45 DERECHO MENGUAR 1 PUNTO EN LA MANGA Y 1 PUNTO EN EL CUELLO: Tejemos 1 p.c., 1 c.a.d. de subida y puntos pareados. Dejando al final 1 punto sin tejer. En total 11 p.b.
VUELTA 46 REVÉS MENGUAR 1 PUNTO EN EL CUELLO: Tejemos 1 p.c., 1 c.a.d. de subida y puntos pareados. En total 10 p.b.
VUELTA 47 DERECHO MENGUAR 1 PUNTO EN EL CUELLO: Tejemos 1 c.a.d. de subida y puntos pareados. Dejando al final 1 punto sin tejer. En total 9 p.b.
VUELTAS 48 a 59: Tejemos 1 c.a.d. de subida y puntos pareados. En total 9 p.b.
Rematamos el hilo con una aguja lanera y cortamos el hilo sobrante.
Podemos seguir tejiendo el delantero derecho o en la espalda.
ROW 38 WRONG SIDE: 1 ch to start the row, couplet stitch (2 sc togethers). 16 sc in total.
ROW 39 RIGHT SIDE: 1 ch to start the row and couplet stitches. 16 sc in total.
ROW 40 WRONG SIDE DECREASE 1 STITCH IN THE SLEEVE: 1 ch to start the row and couplet stitches. Do not make the last stitch. 15 sc in total.
ROW 41 RIGHT SIDE: 1 ch to start the row and couplet stitch. 15 sc in total.
ROW 42 WRONG SIDE DECREASE 1 STITCH IN THE SLEEVE: 1 ch to start the row and couplet stitch. Do not make the last stitch. 14 sc in total.
ROW 43 RIGHT SIDE: Por la lazada trasera, 1 ch to start the row and couplet stitch. 14 sc in total.
ROW 44 WRONG SIDE DECREASE 1 STITCH IN THE SLEEVE: 1 ch to start the row and couplet stitch. Do not make the last stitch. 13 sc in total.
ROW 45 RIGHT SIDE DECREASE 1 STITCH IN THE SLEEVE AND 1 STITCH IN THE COLLAR: 1 sl st, 1 ch to start the row and couplet stitch. Do not make the last stitch. 11 sc in total.
ROW 46 WRONG SIDE DECREASE 1 STITCH IN THE COLLAR: 1 sl st, 1 ch to start the row and couplet stitch. 10 sc in total
ROW 47 RIGHT SIDE DECREASE 1 STITCH IN THE COLLAR: 1 ch to start the row and couplet stitch. Do not make the last stitch. 9 sc in total.
ROWS 48 a 59: 1 ch to start the row and couplet stitchs. 9 sc in total.
Finish off and cut the remaining threads.
You can keep working on the front right side or the back.

ESPALDA / BACK
Comenzaremos a tejer en el marcador para la espalda.
VUELTA 38 REVÉS: Tejemos 1 c.a.d. de subida y puntos pareados. En total 43 p.b.
VUELTA 39 DERECHO: Tejemos 1 c.a.d. de subida y puntos pareados. En total 43 p.b.
VUELTA 40 REVÉS MENGUAR 1 PUNTO A CADA LADO: Tejemos 1 p.c., 1 c.a.d. de subida y puntos pareados. Dejando al final 1 punto sin tejer. En total 41 p.b.
VUELTA 41 DERECHO: Tejemos 1 c.a.d. de subida y puntos pareados. En total 41 p.b.
VUELTA 42 REVÉS MENGUAR 1 PUNTO A CADA LADO: Tejemos 1 p.c., 1 c.a.d. de subida y puntos pareados. Dejando al final 1 punto sin tejer. En total 39 p.b.
VUELTA 43 DERECHO: Por la lazada trasera, tejemos 1 c.a.d. de subida y puntos pareados. En total 39 p.b.
VUELTA 44 REVÉS MENGUAR 1 PUNTO A CADA LADO: Tejemos 1 p.c., 1 c.a.d. de subida y puntos pareados. Dejando al final 1 punto sin tejer. En total 37 p.b.
VUELTAS 45 a 59: Tejemos 1 c.a.d. de subida y puntos pareados. En total 37 p.b.
Rematamos el hilo con una aguja lanera y cortamos el hilo sobrante.
Start to work at the marker of the back.
ROW 38 WRONG SIDE: 1 ch to start the row and couplet stitch . 43 sc in total.
ROW 39 RIGHT SIDE: 1 ch to start the row and couplet stitch. 43 sc in total.
ROW 40 WRONG SIDE DECREASE 1 STITCH IN EACH SIDE: 1 sl st 1 ch to start the row and couplet stitch. Do not make the last stitch. 41 sc in total.
ROW 41 RIGHT SIDE: 1 ch to start the row and couplet stitch. 41 sc in total.
ROW 42 WRONG SIDE DECREASE 1 STITCH IN EACH SIDE: s 1 p.c., 1 ch to start the row and couplet stitch. Do not make the last stitch. 39 sc in total.
ROW 43 RIGHT SIDE: In the back loop only, 1 ch to start the row and couplet stitch. 43 sc in total.
ROW 44 WRONG SIDE DECREASE 1 STITCH IN EACH SIDE: 1 p.c., 1 ch to start the row and couplet stitch. Do not make the last stitchr. 37 sc in total.
ROW 45 to 59: 1 ch to start the row and couplet stitch. 43 sc in total.
Finish off and cut the remaining threads.

DELANTERO DERECHO / RIGHT FRONT
Comenzaremos a tejer en el marcador para el delantero derecho.
VUELTA 38 REVÉS: Tejemos 1 c.a.d. de subida y puntos pareados. En total 16 p.b.
VUELTA 39 DERECHO: Tejemos 1 c.a.d. de subida y puntos pareados. En total 16 p.b.
VUELTA 40 REVÉS MENGUAR 1 PUNTO EN LA MANGA: Tejemos 1 p.c., 1 c.a.d. de subida y puntos pareados. En total 15 p.b.
VUELTA 41 DERECHO: Tejemos 1 c.a.d. de subida y puntos pareados. En total 15 p.b.
VUELTA 42 REVÉS MENGUAR 1 PUNTO EN LA MANGA: Tejemos 1 p.c., 1 c.a.d. de subida y puntos pareados. En total 14 p.b.
VUELTA 43 DERECHO: Por la lazada trasera, tejemos 1 c.a.d. de subida y puntos pareados. En total 14 p.b.
VUELTA 44 REVÉS MENGUAR 1 PUNTO EN LA MANGA: Tejemos 1 p.c., 1 c.a.d. de subida y puntos pareados. En total 13 p.b.
VUELTA 45 DERECHO MENGUAR 1 PUNTO EN LA MANGA Y 1 PUNTO EN EL CUELLO: Tejemos 1 p.c., 1 c.a.d. de subida y puntos pareados. Dejando al final 1 punto sin tejer. En total 11 p.b.
VUELTA 46 REVÉS MENGUAR 1 PUNTO EN EL CUELLO: Tejemos 1 c.a.d. de subida y puntos pareados. Dejando al final 1 punto sin tejer. En total 10 p.b.
VUELTA 47 DERECHO MENGUAR 1 PUNTO EN EL CUELLO: Tejemos 1 p.c., 1 c.a.d. de subida y puntos pareados. En total 9 p.b.
VUELTAS 48 a 59: Tejemos 1 c.a.d. de subida y puntos pareados. En total 9 p.b.
Rematamos el hilo con una aguja lanera y cortamos el hilo sobrante.
Start to work in the marker of the right front.
ROW 38 WRONG SIDE: 1 ch to start the row and couplet stitch. 16 sc in total.
ROW 39 RIGHT SIDE: 1 ch to start the row and couplet stitch. 16 sc in total.
ROW 40 WRONG SIDE DECREASE 1 STITCH IN THE SLEEVE: 1 p.c., 1 ch to start the row and couplet stitch. 15 sc in total.
ROW 41 RIGHT SIDE: 1 ch to start the row and couplet stitch. 15 sc in total.
ROW 42 WRONG SIDE DECREASE 1 STITCH IN THE SLEEVE: 1 sl st, 1 ch to start the row and couplet stitch. 14 sc in total.
ROW 43 RIGHT SIDE: In the back loop only, 1 ch to start the row and couplet stitch. 14 sc in total.
ROW 44 WRONG SIDE DECREASE 1 STITCH IN THE SLEEVE: 1 sl st, 1 ch to start the row and couplet stitch. 13 sc in total.
ROW 45 RIGHT SIDE DECREASE 1 STITCH IN THE SLEEVE AND 1 STITCH IN THE COLLAR: 1 sl st1 ch to start the row and couplet stitch. Do not make the last stitch. 11 sc in total.
ROW 46 WRONG SIDE DECREASE 1 STITCH IN THE COLLAR 1 ch to start the row and couplet stitch. Do not make the last stitch. 10 sc in total.
ROW 47 RIGHT SIDE DECREASE 1STITCH IN THE COLLAR: 1 sl st, 1 ch to start the row and couplet stitchs. 9 sc in total.
ROWS 48 to 59:1 ch to start the row and couplet stitch. 9 sc in total.
Finish off and cut the remaining threads.
UNIÓN DELANTEROS Y ESPALDA / JOIN RIGHT AND BACK SIDE
Encaramos por el derecho de la prenda, los 9 puntos de los delanteros con 9 puntos de la espalda. Tejemos puntos corredizos con poca tensión por debajo de las dos lazadas de los últimos puntos. Este método de unión COSTURA CON PUNTO CORREDIZO. Se explica detalladamente en la CLASE 6. CONSEJOS PRÁCTICOS DEL CROCHET.
Face the two right sides of the vest, 9 stitches of the front with 9 stitches of the back. Make sl sts under the two loops of the last stitches. This method of joining is explained in detail in SLIP STITCH SEAM in CLASS 6. CROCHET PRACTICAL TIPS

TERMINACIÓN DE CHALECO / FINISHING OFF
Alrededor de todo el chaleco y las mangas tejemos una terminación de puntos bajos y puntos de cangrejo de punto bajo.
VUELTA 1: Comenzando en el centro de la espalda tejemos 1 c.a.d. de subida y 1 p.b. alrededor de todo el chaleco. En las esquinas inferiores de los delanteros tejeremos 3 p.b. juntos.
Finish off with sc and sc crab stitch around the vest and sleeves
ROW 1: Beginning in the centre of the back we make 1 ch and sc around the vest around the vest. At the bottom corners of the front, make 3 sc together.

VUELTA 2: Tejemos p.can.p.b.
En el siguiente vídeo podéis ver cómo se teje el punto de cangrejo de punto bajo.
ROW 2: sc crab stitch
In the video below you can learn how to do single crochet crab stitch.
Rematamos el hilo con una aguja lanera y cortamos el hilo sobrante.
Finish off and cut the remaining threads.
De la misma forma, haremos la misma terminación en ambas mangas.
Do the same for both sleeves.
FLECOS EN DELANTEROS / FRONT TASSELS
Hacer flecos en la VUELTA 42, debajo de la línea formada por la lazada delantera de la VUELTA 43. Nuestros flecos tiene un solo hilo de 80 cm.
En el siguiente vídeo podéis ver cómo se ponen flecos en una prenda.
Make fringes in ROW 42 under the line formed for the front loop of ROW 43. The tassels have only 1 thread of 80 cm.
In the video below you can learn how to put tassels in a garment.
COLOCACIÓN DE CUENTAS / PLACEMENT OF THE BEADS
En la VUELTA 43 de los delanteros y la espalda hemos dejado una lazada vista. En ella vamos a tejer p.c. y cada 3 p.c. insertaremos una cuenta.
In ROW 43 we left a loop visible. Make the following: 1 sl st, and every 3 sl st insert 1 bead.

Hemos puesto 5 cuentas en cada delantero y 14 en la espalda.
Place 5 beads in each front and 14 in the back.


CINTA PARA ABROCHAR EL CHALECO / CORD TO FASTEN THE VEST
Hemos tejido dos cintas de punto corredizo y las hemos adornado con 2 cuentas en los extremos del hilo.
We have sewn two cords in sl st with 2 beads at the ends.

VUELTA INICIAL: Tejemos 70 c.a.d.
VUELTA 1: Tejemos 1 p.c. en la terminación del chaleco donde queramos abrochar nuestro chaleco y 70 p.c. sobre la c.a.d.
¡Ahora puedes lucir tu chaleco!
FOUNDATION ROW: 70 ch.
ROW 1: 1 sl st at the same high you want to fasten the vest and 70 sl st on the chains.
Now you can show off you vest!

Es muy bonito y fresquito, te sienta fenomenal! Besitos
Me gustaMe gusta
Muchas gracias Oscar! Esta ocasional modelo agradece mucho tus cumplidos.
Me gustaLe gusta a 1 persona
Pues si no eras tú le he puesto tu cara, ja ja ja. A esa ocasional modelo también le queda fenomenal, la verdad. 🙂
Me gustaMe gusta
Hermoso, muchas gracias
Me gustaMe gusta
Muchas gracias a ti Nancy por seguirnos.
Me gustaMe gusta
Qué bonito!! Cada día os superáis. Este me lo apunto 😉
Me gustaMe gusta
Bien! Envíanos una foto del resultado.
Me gustaMe gusta